Email Support FAQs
Automatic POP/IMAP email account setup in Microsoft Outlook 2016
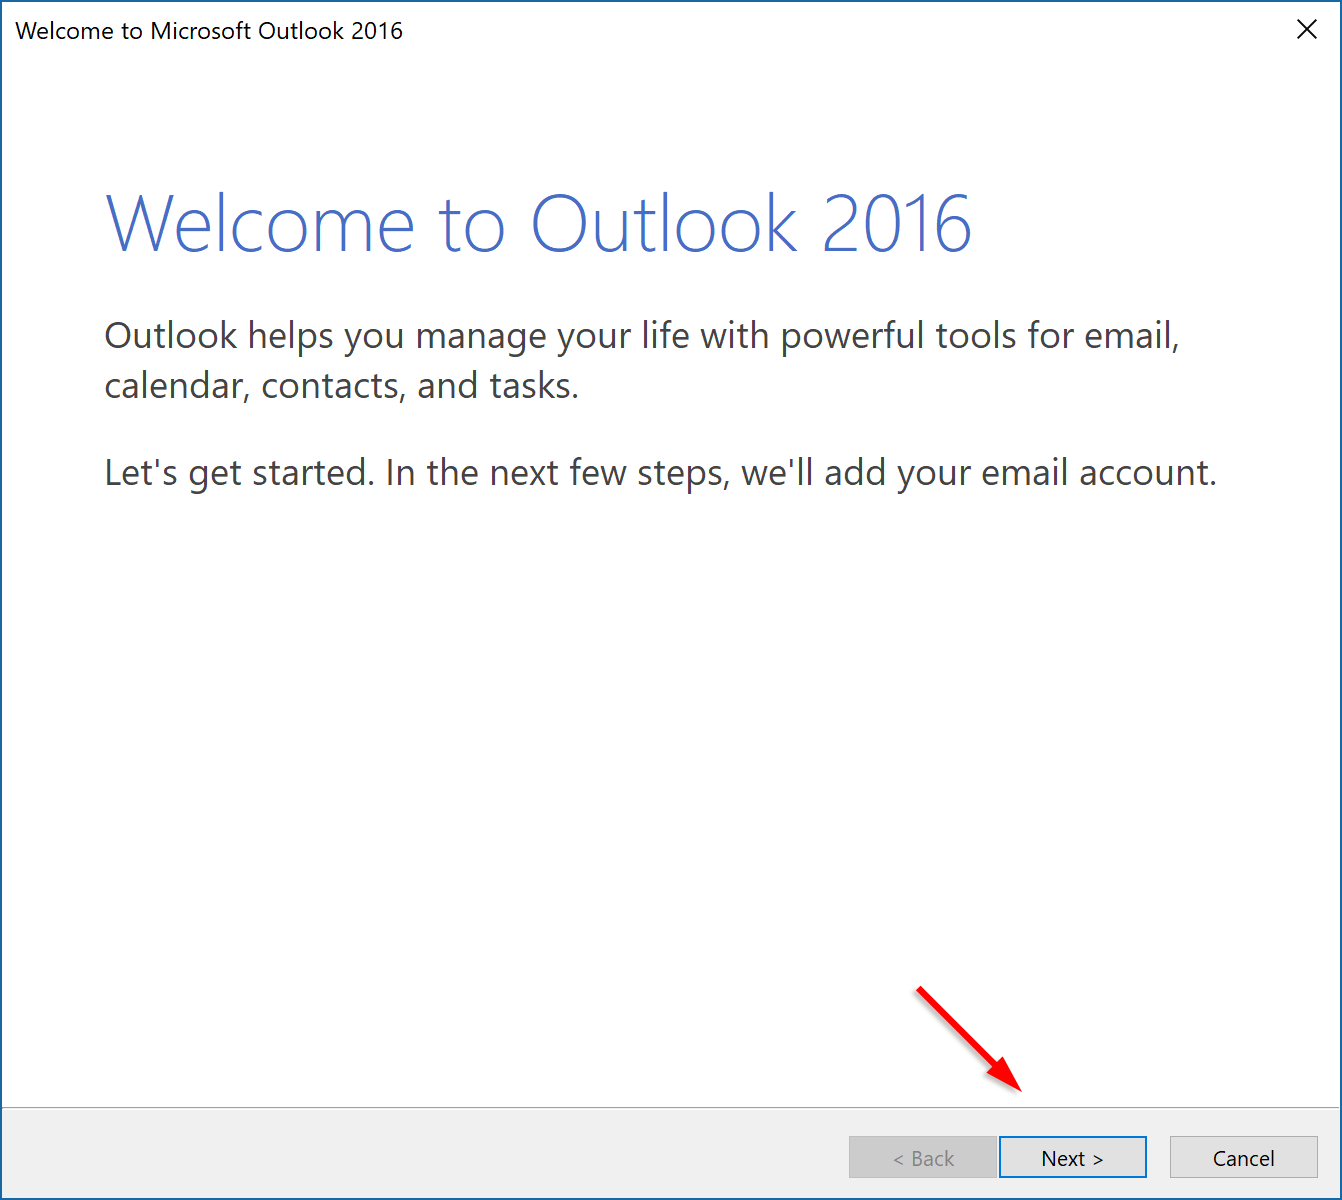
Step 1: Launch Outlook.
When it starts, the ‘welcome screen’ should appear. Click the Next button to begin the setup.
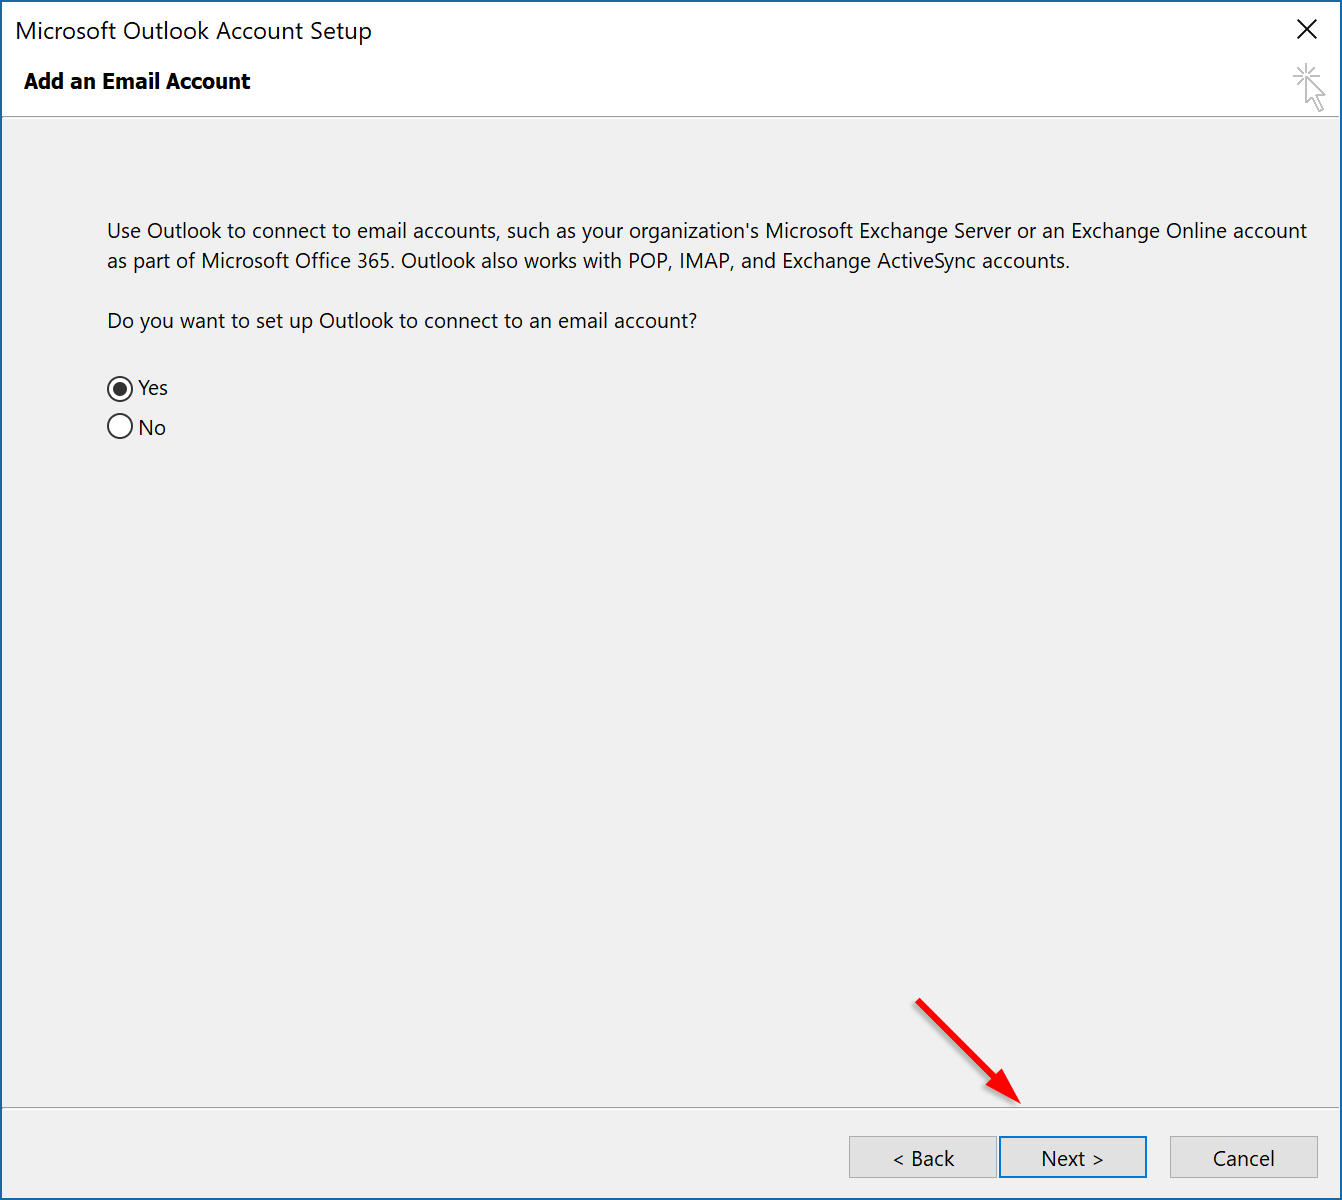
Step 2: Add an email account.
In the Add an Email Account wizard displayed, you’ll be asked Do you want to set up Outlook to connect to an email account? Ensure the radio button next to Yes is selected, then click Next.
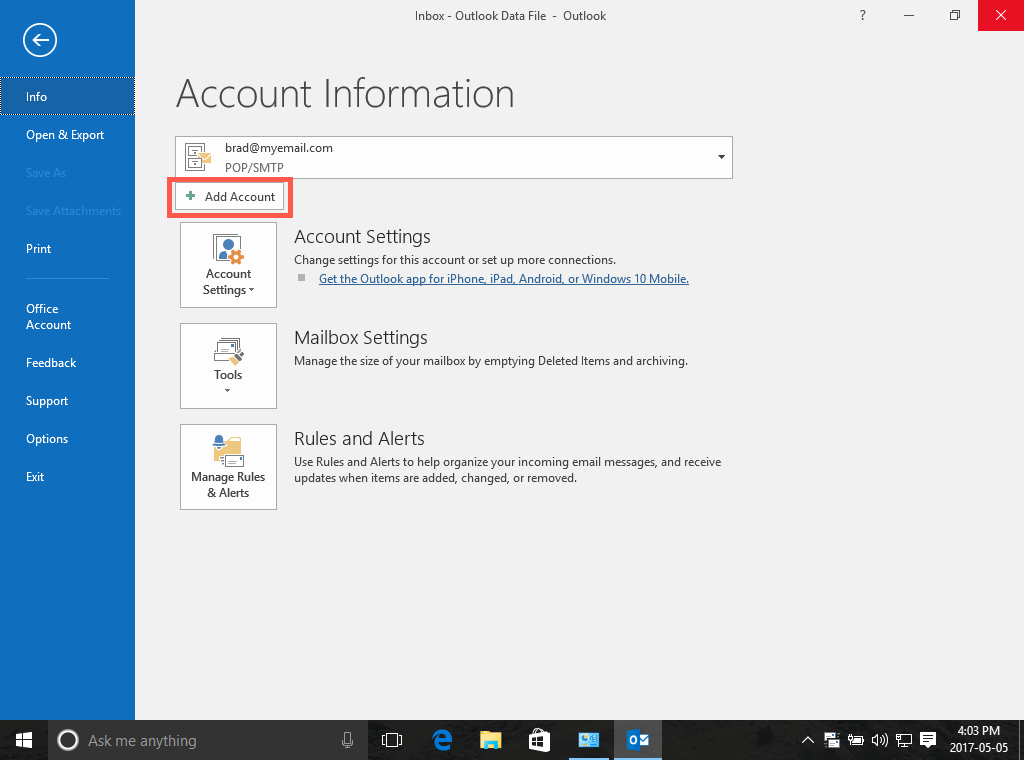
If you’ve previously configured Outlook 2016, click the File tab at the top of the window and in the Info category, click the Add Account button.
Step 3: Enter your account details.
Enter the account details for the email you want to add:
- Your Name: Enter the name you’d like to appear on your emails.
- Email Address: Your full email address.
- Password: Your email account password.
- Retype Password: Enter your email account password again.
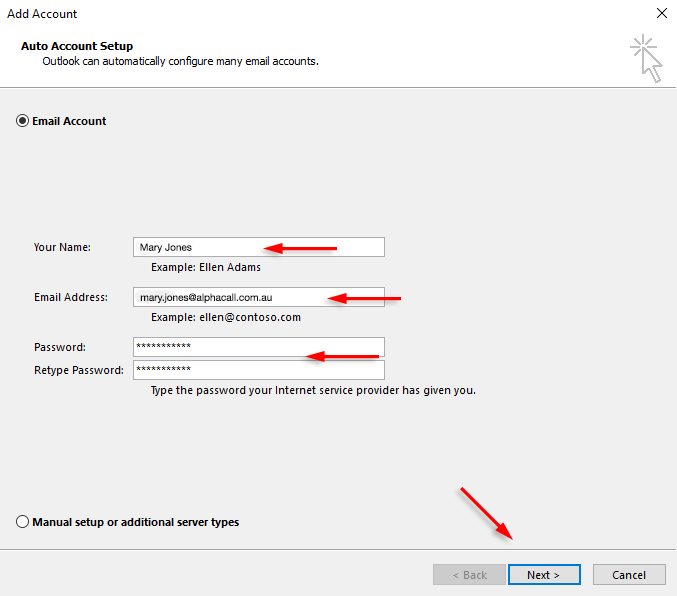
Click Next. Outlook will now attempt to retrieve your email server details and set up account access.
Step 4: Done.
That’s it – you’re done – have fun emailing!
Manual POP/IMAP email account setup in Microsoft Outlook 2016
If your server cannot be found, check that the email address you entered is correct and try again. You can enter your server details manually by selecting Manual setup or additional server types. Then, click Next.
Outlook 2016 supports standard POP3/IMAP email accounts, Microsoft Exchange or Office 365 accounts, as well as webmail accounts from a range of providers including Outlook.com, Hotmail, iCloud, Gmail, Yahoo and more. For Nelson Bay Online email services, select POP or IMAP.
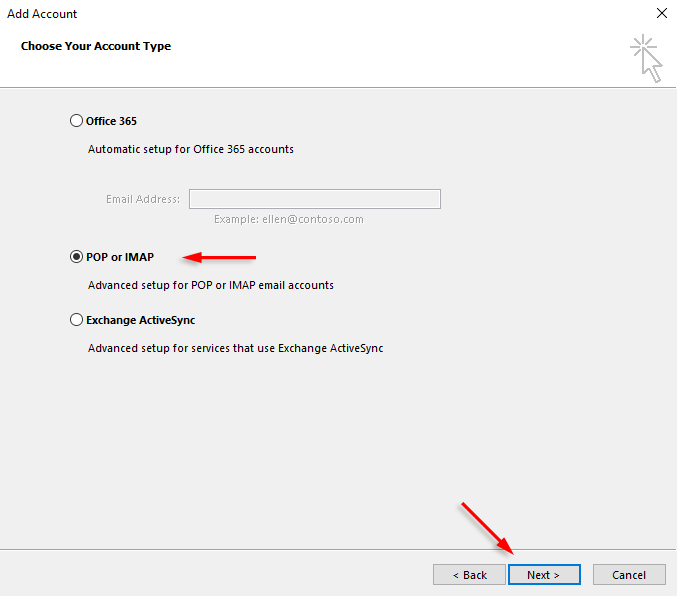
Step 1: Choose your account type.
Once you have clicked the radio button next to POP or IMAP, select Next to proceed with your email account configuration. You’ll need your email server details, username and password to hand.
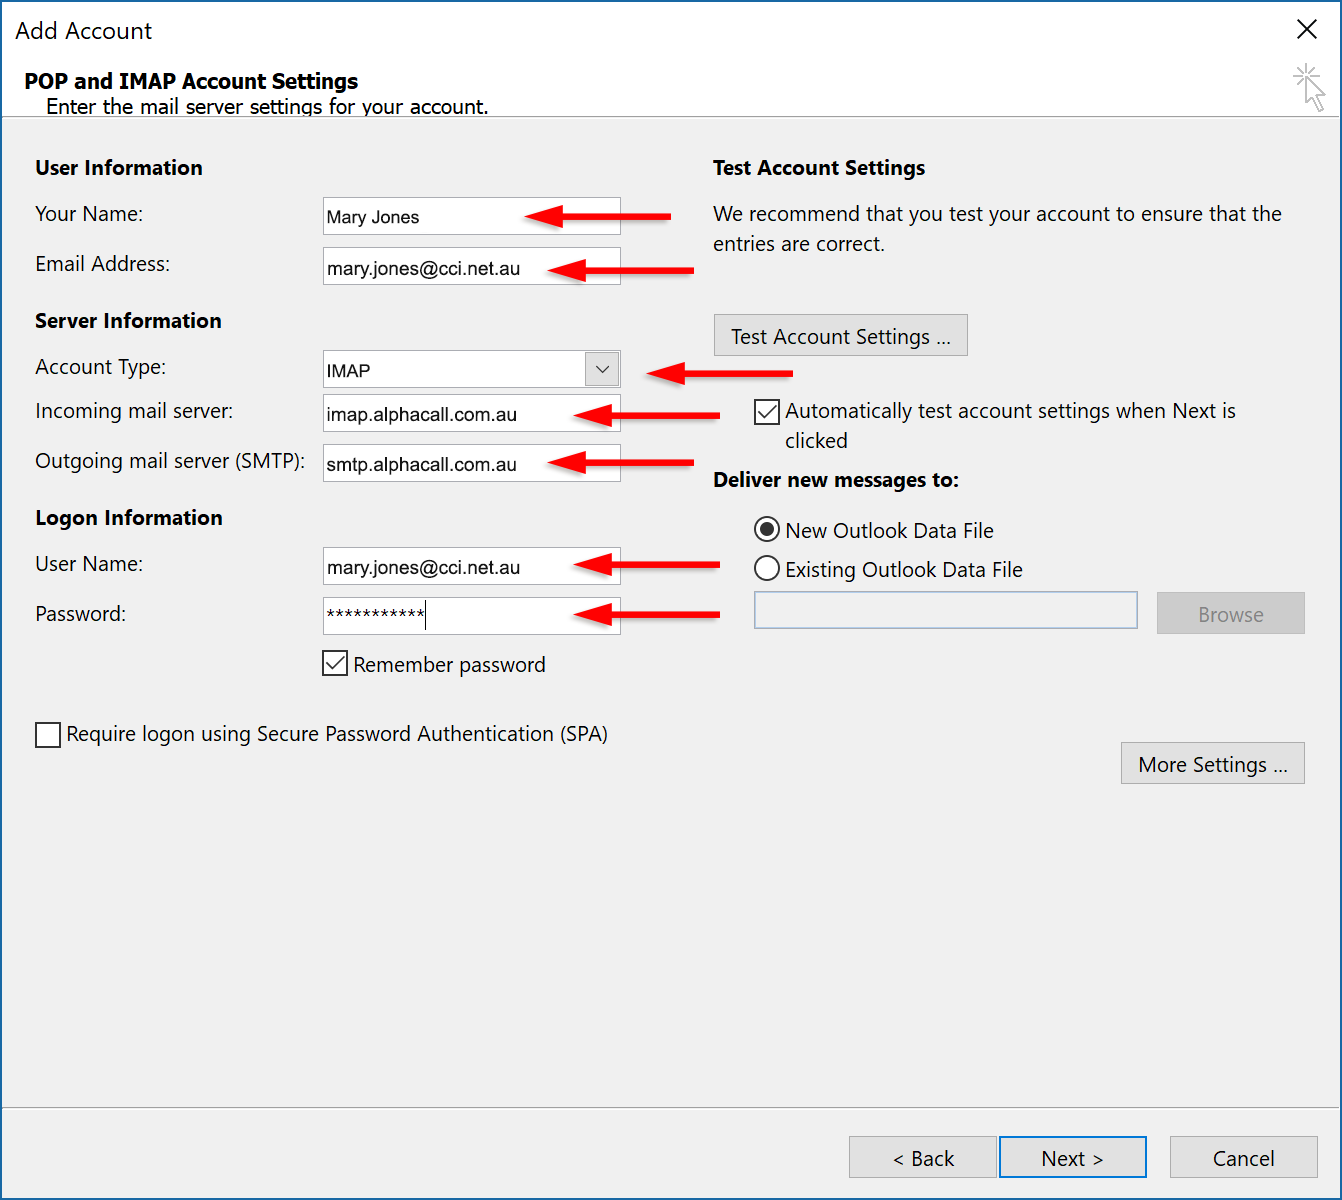
Step 2: Enter the mail server settings for your account.
Enter the following details:
- Your Name: Enter the sender’s name you’d like to appear on your emails.
- Email Address: Your full email address.
- Account Type: Use the dropdown menu to select IMAP.
- Incoming mail server: For POP or IMAP accounts use imap.alphacall.com.au.
- Outgoing mail server (SMTP): For POP or IMAP accounts use smtp.alphacall.com.au.
- User Name: Your email account username (usually the same as your email address).
- Password: Your email account password.
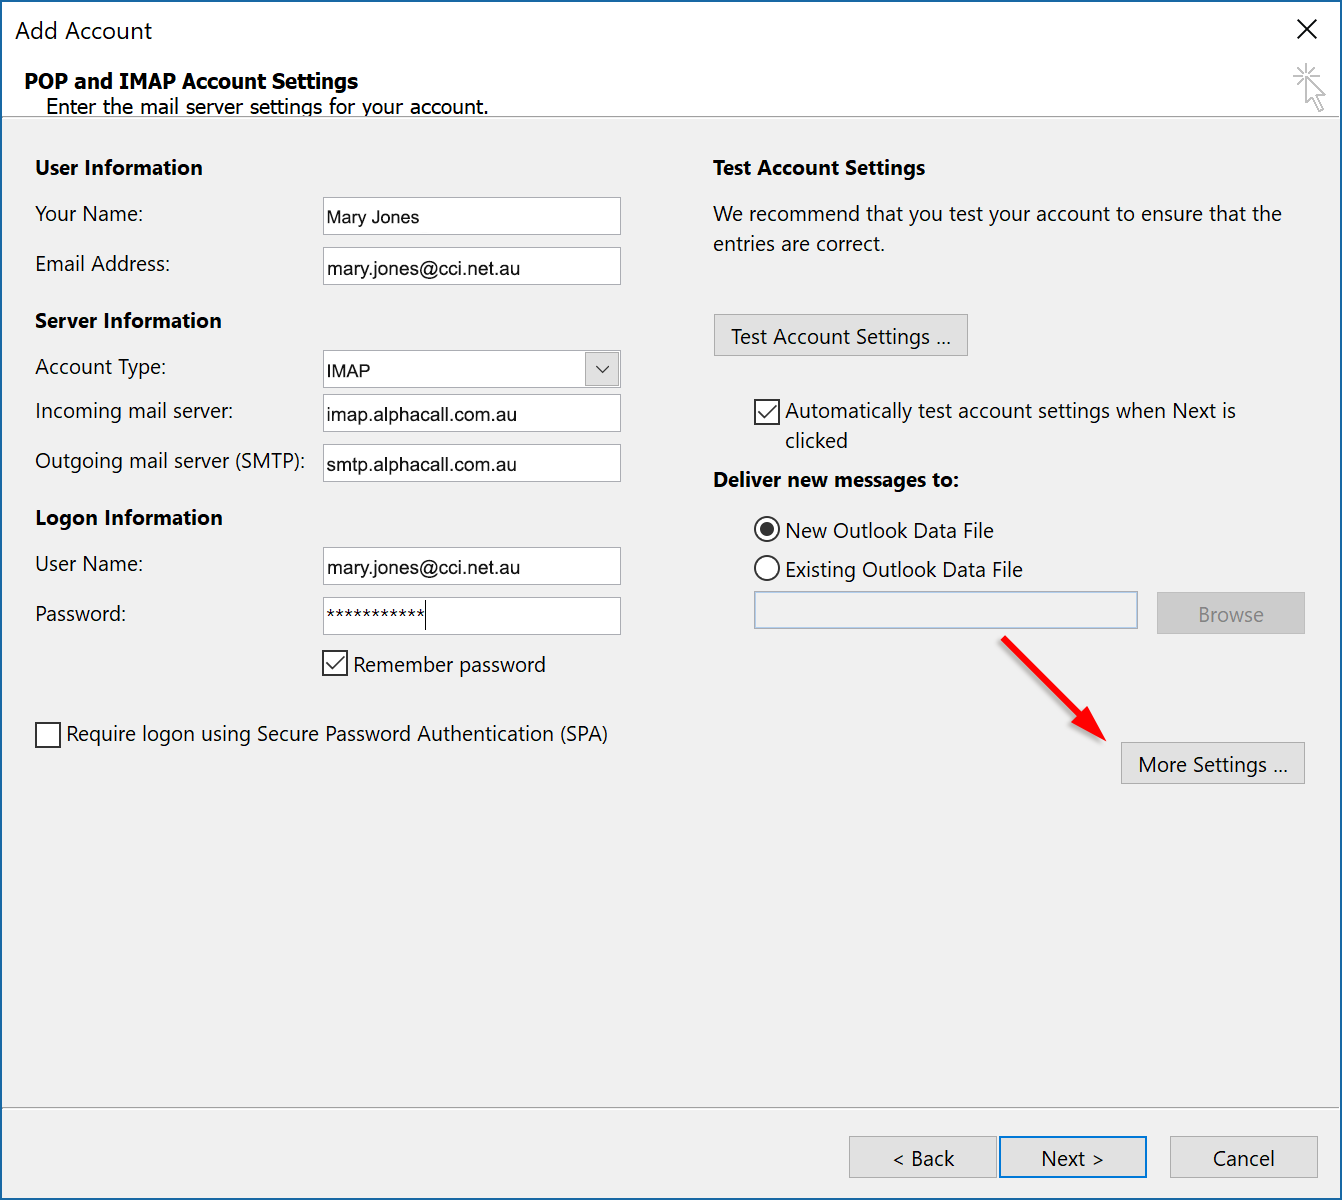
Step 3: More Settings.
Now click the More Settings… button.
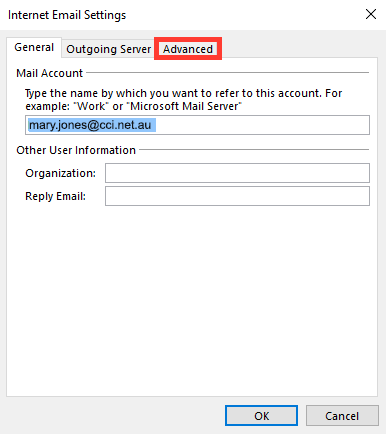
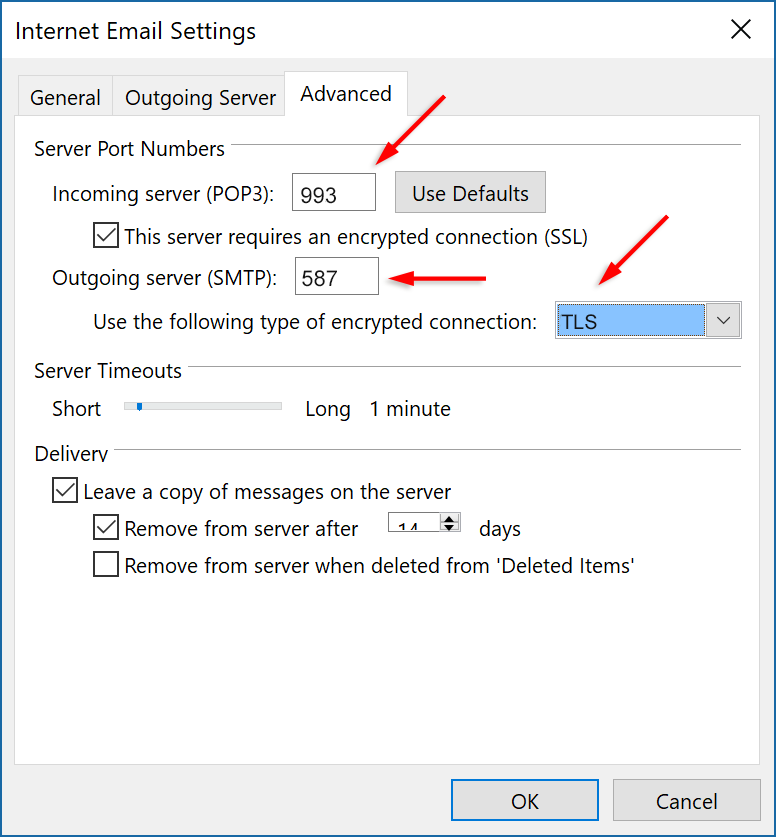
In the Internet Email Settings window that opens, select the Advanced tab.
Enter the following details:
- Incoming server: Ensure the default port is set to 993 for IMAP accounts. Click the checkbox next to This server requires an encrypted connection (SSL).
- Outgoing server (SMTP): Change the default port (25) to 587 for POP or IMAP accounts. Use the dropdown menu next to Use the following type of encrypted connection to select TLS.
Switch to the Outgoing Server tab. Check the box next to My outgoing server (SMTP) requires authentication, then click the radio button next to Use same settings as my incoming mail server.
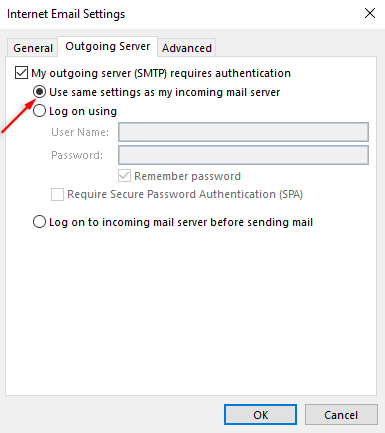
Click OK to close the Internet E-mail Settings window.
Step 4: Test Account Settings.
In the POP and IMAP Account Settings window, click the Test Account Settings…button to ensure Outlook can communicate with your email server.
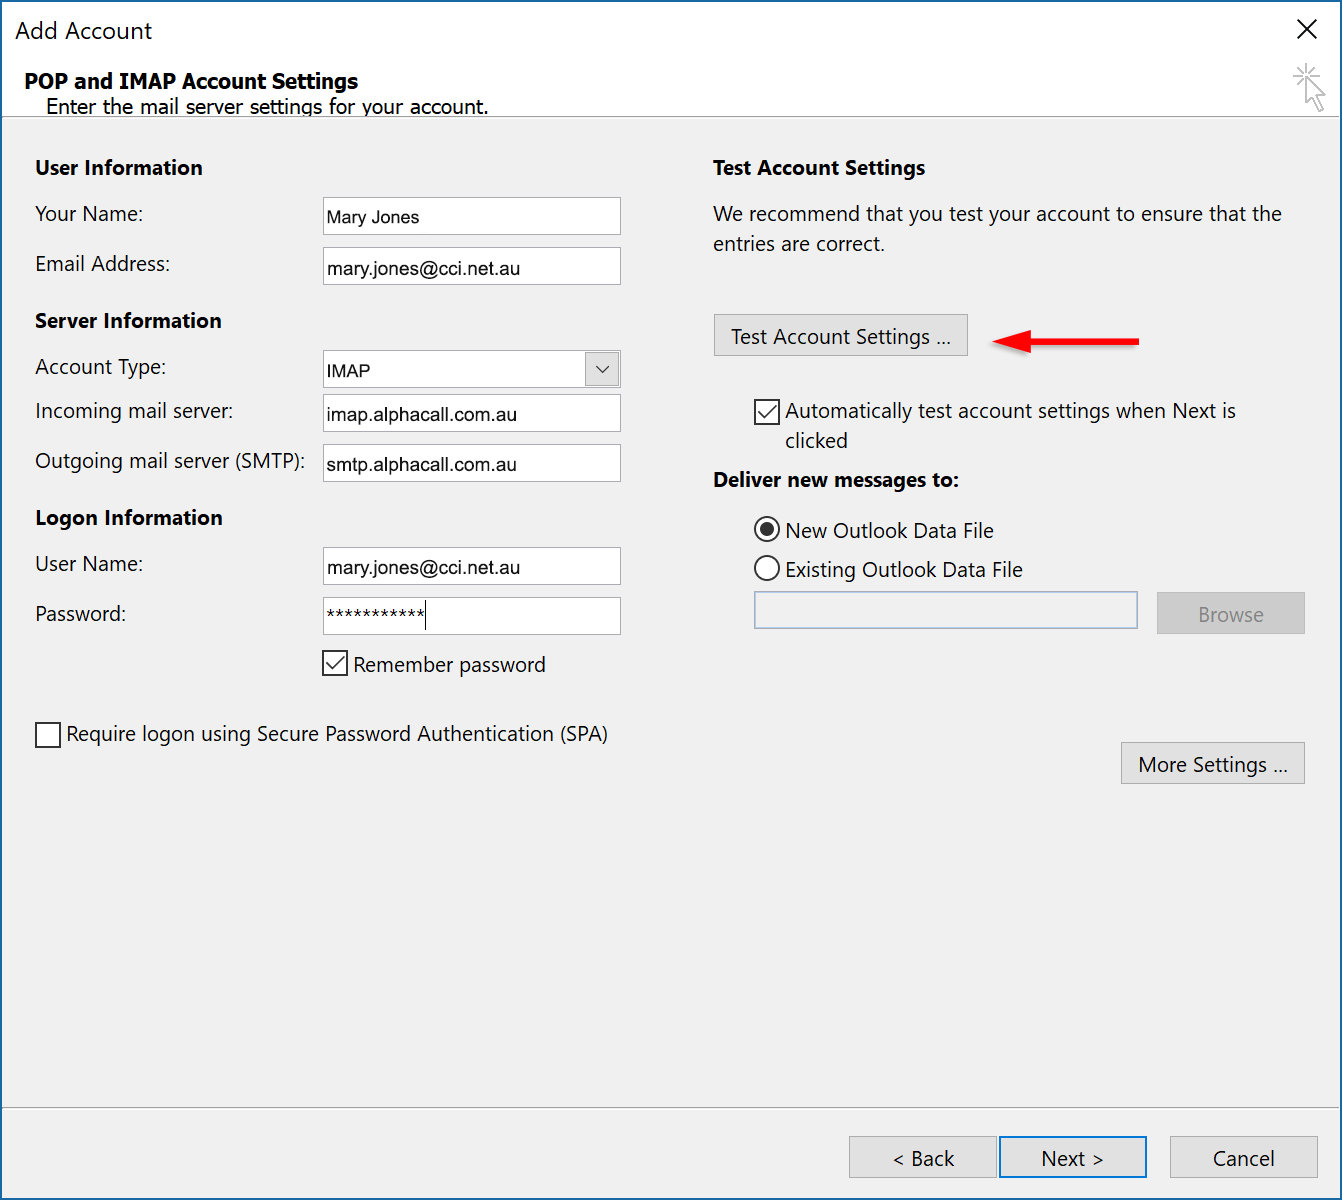
If the test fails, retrace your steps, ensuring your server and account details have been entered correctly.
Step 5: Done!
Once the test completes successfully, click Next and then Finish to wrap up.
How to add your email account with IMAP to the mail app on your iPhone with iOS 11
In this guide we show you how to add your email account with IMAP to the mail app on your iPhone with iOS 11.
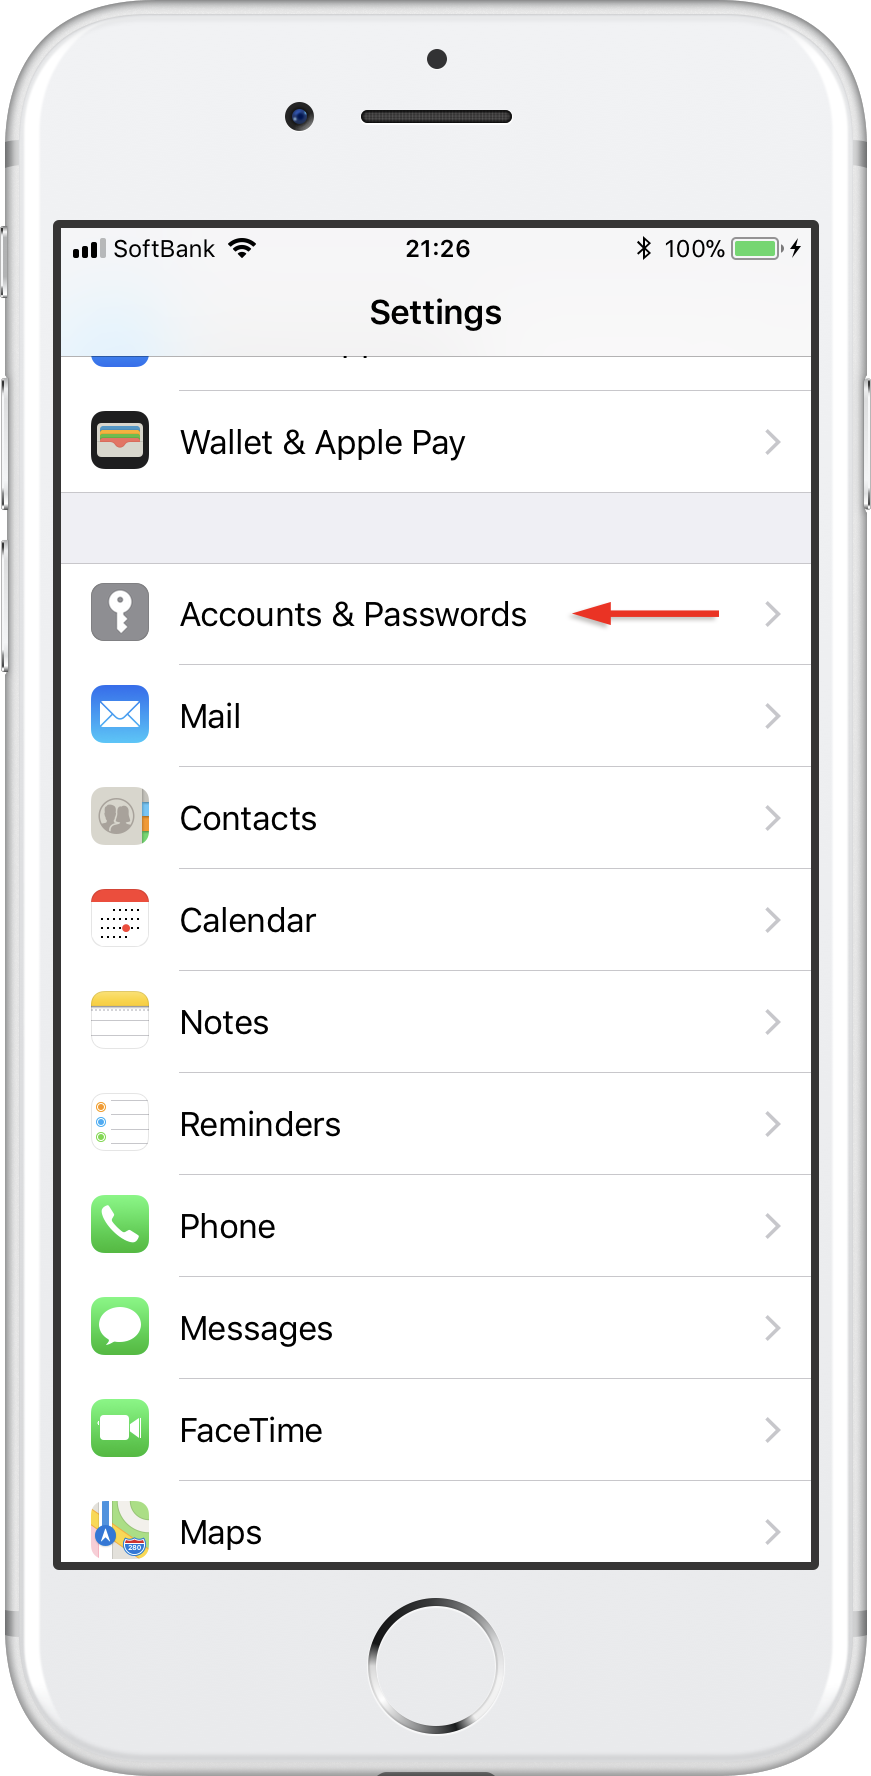
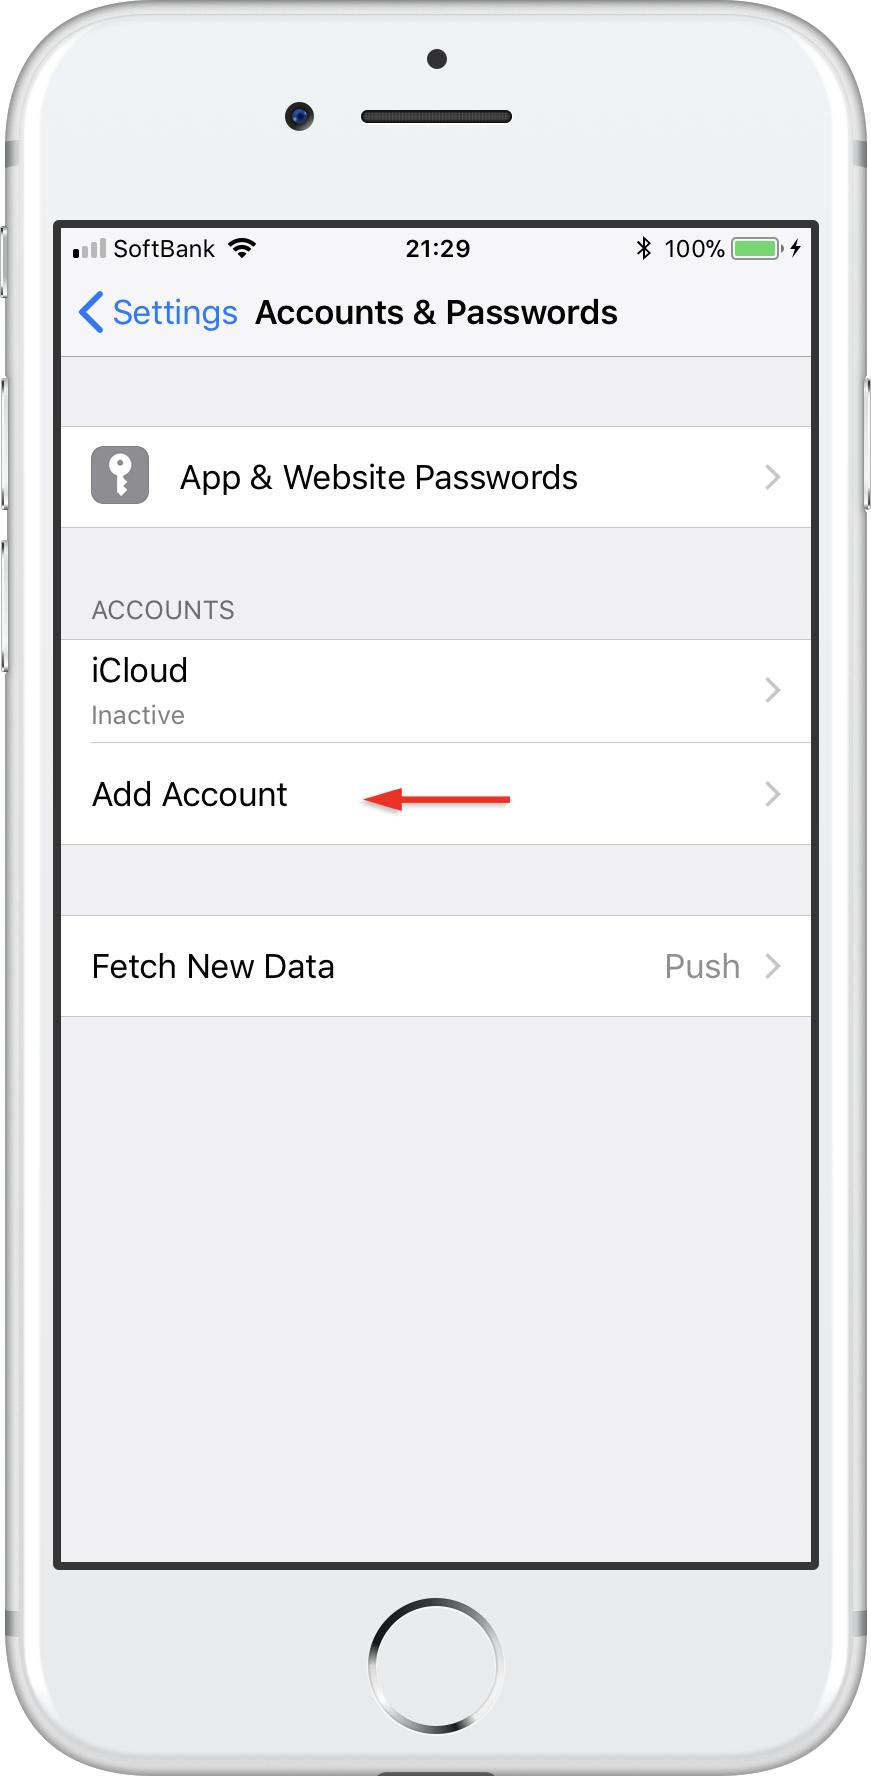
Step 1: Go to Settings > Accounts & Passwords
Open Settings on your iPhone and tap Accounts & Passwords.
Step 2: Tap Add account.
Tap Add account.
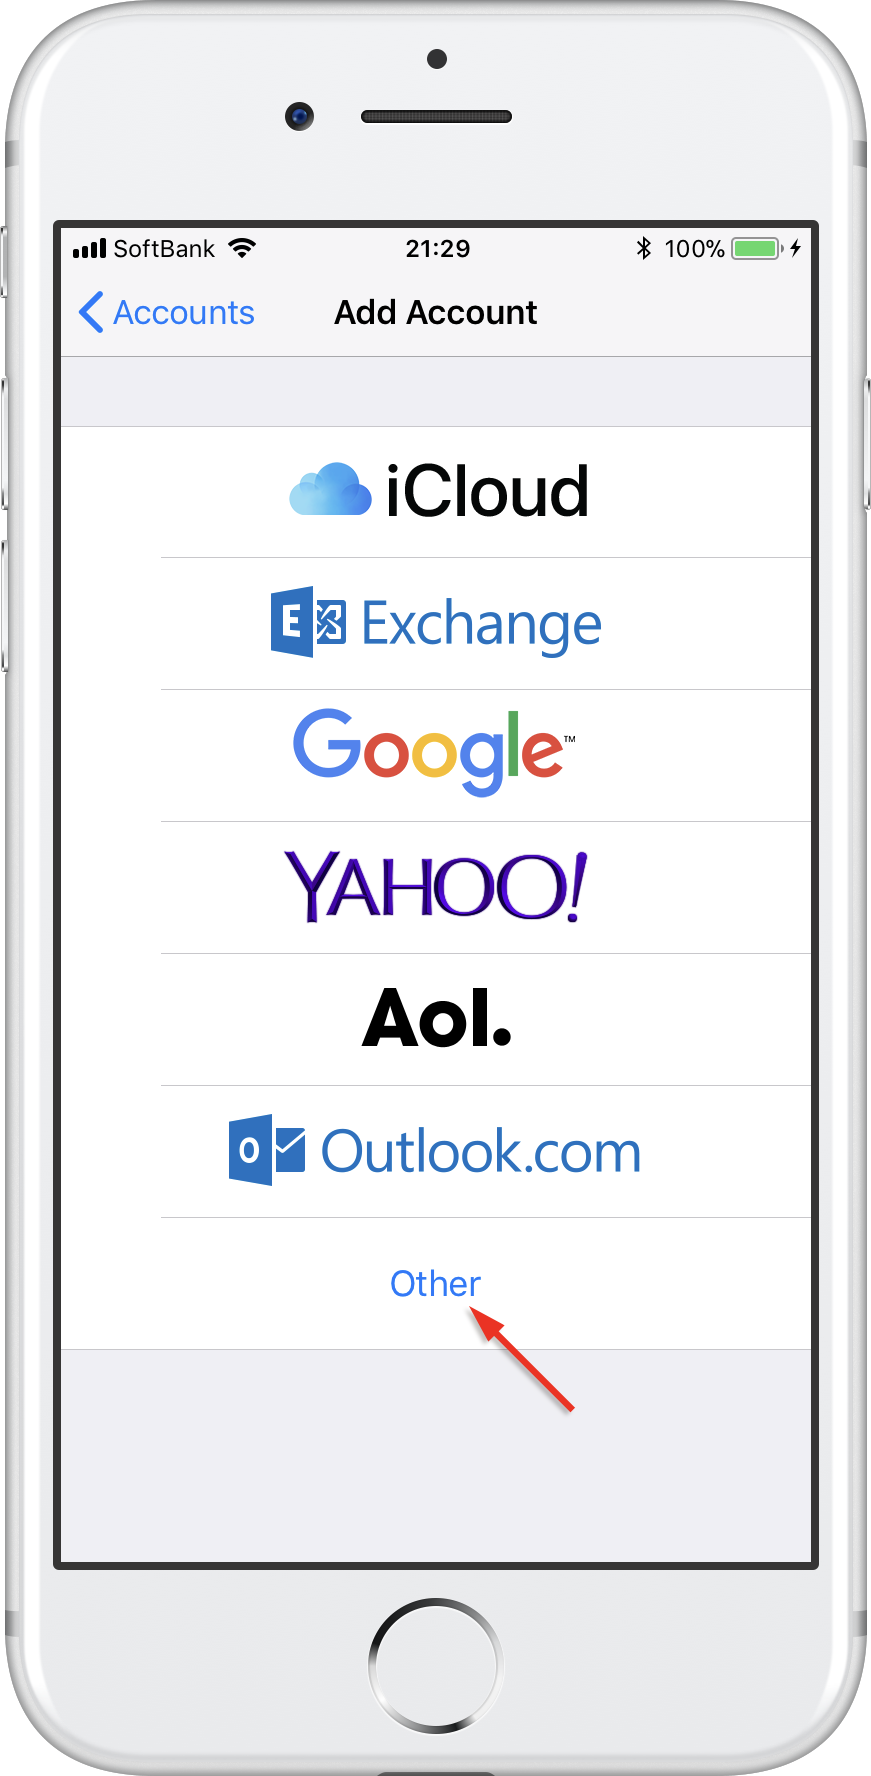
Step 3: Tap Other.
Select Other as account type.
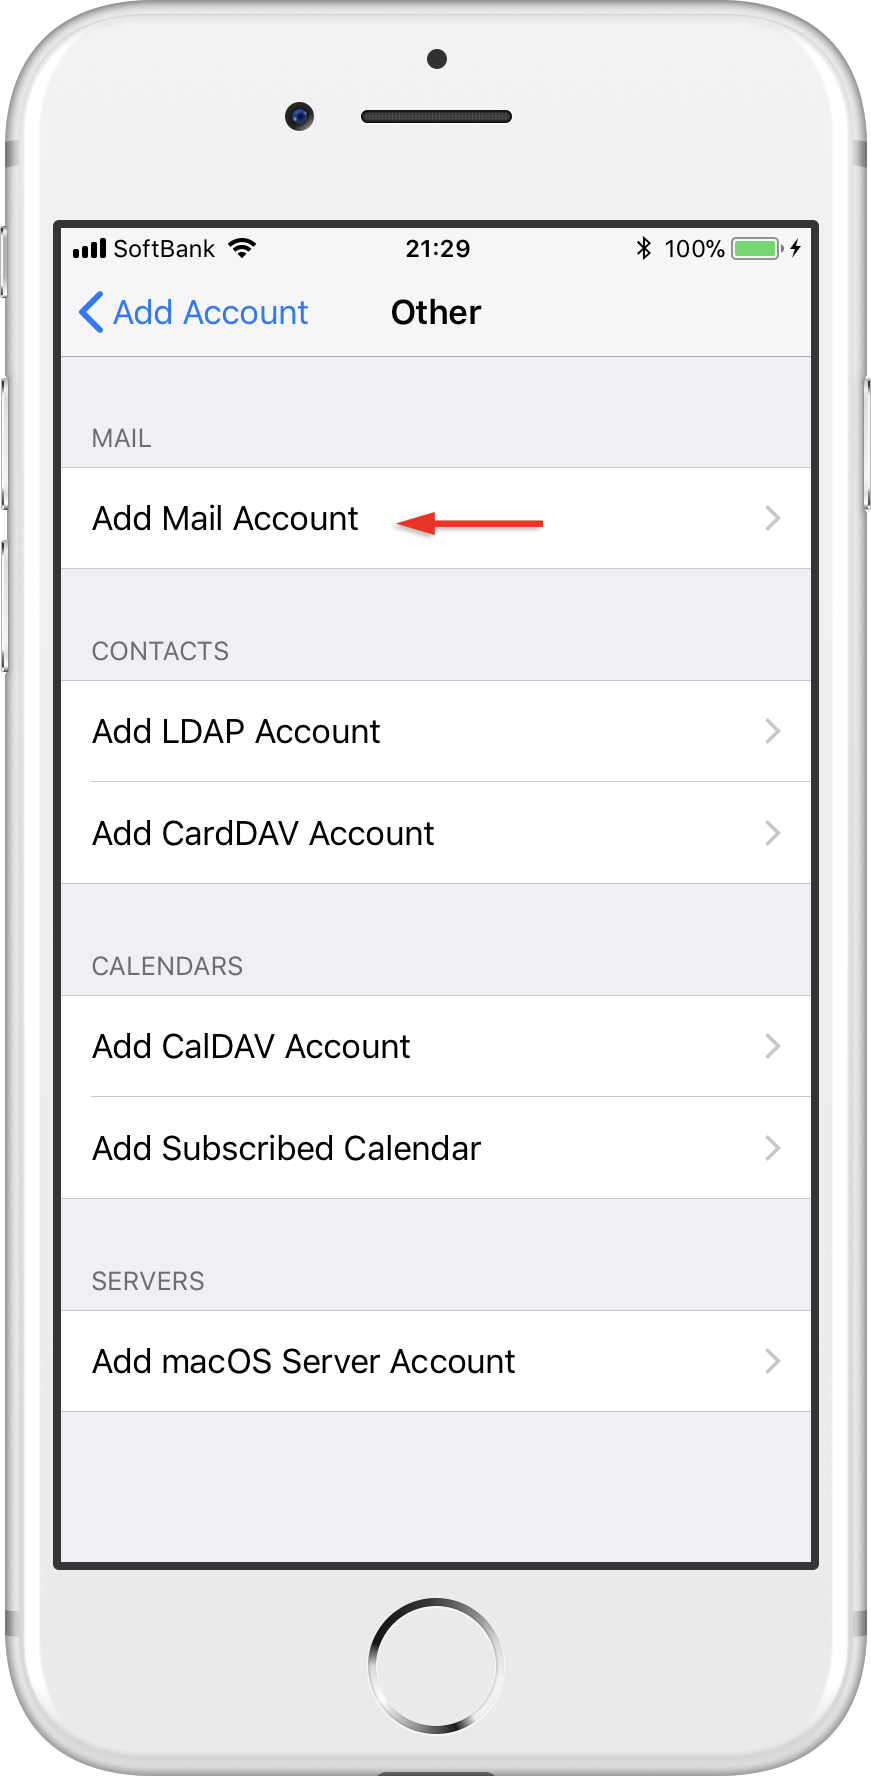
Step 4: Tap Add Mail Account
Tap Add Mail Account.
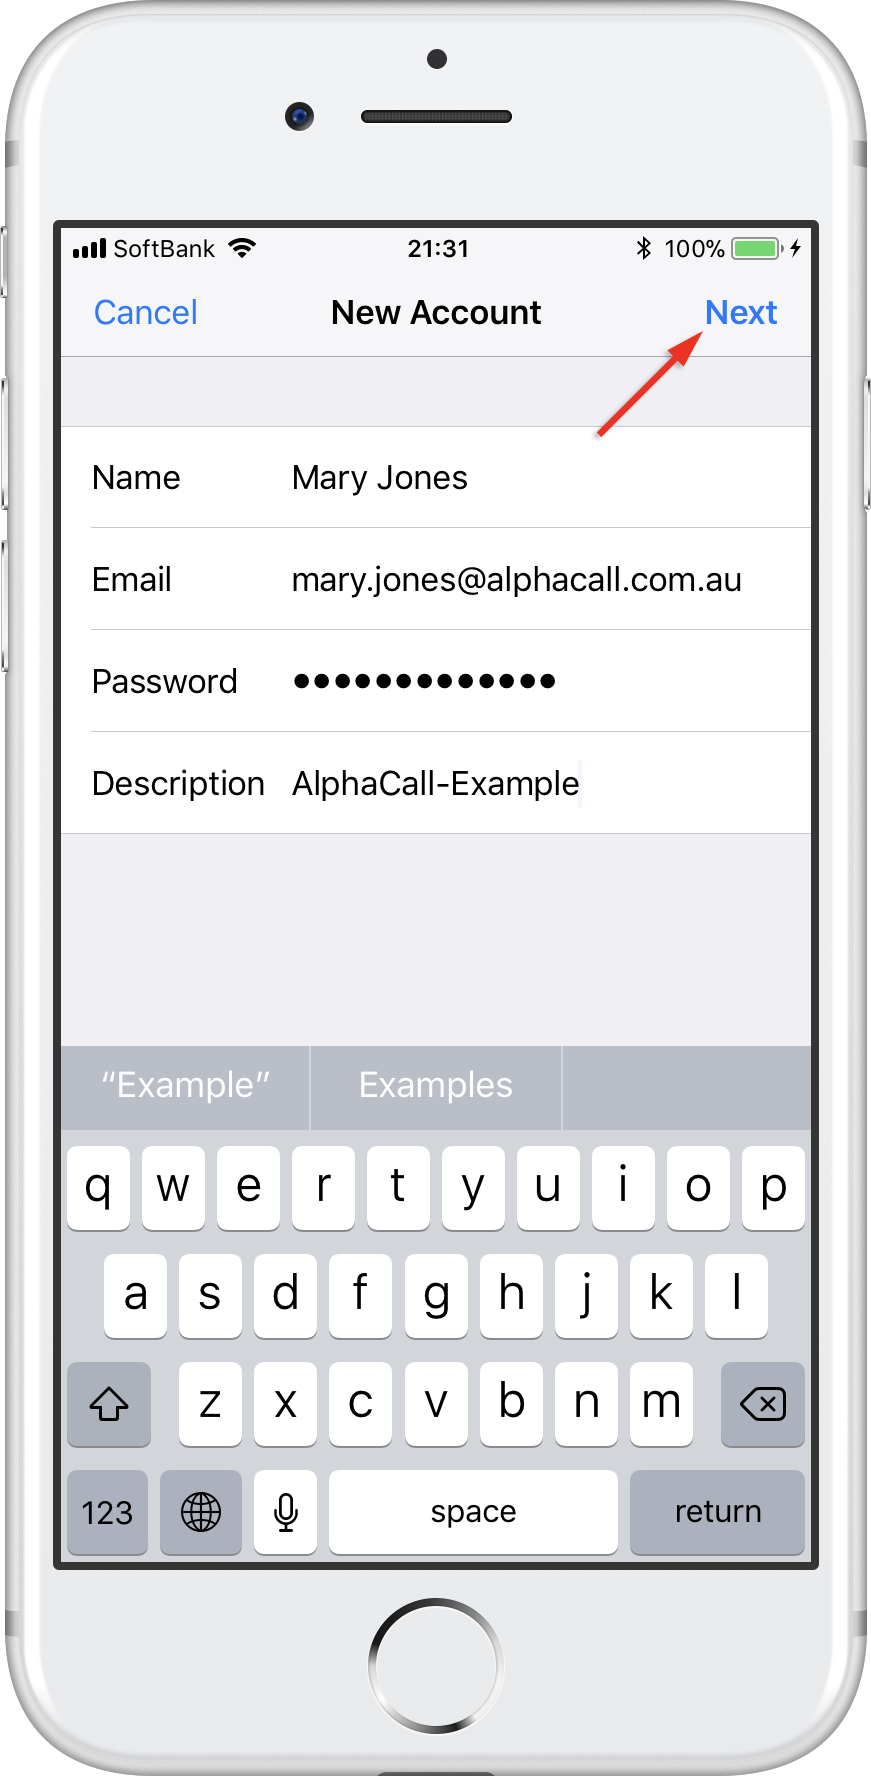
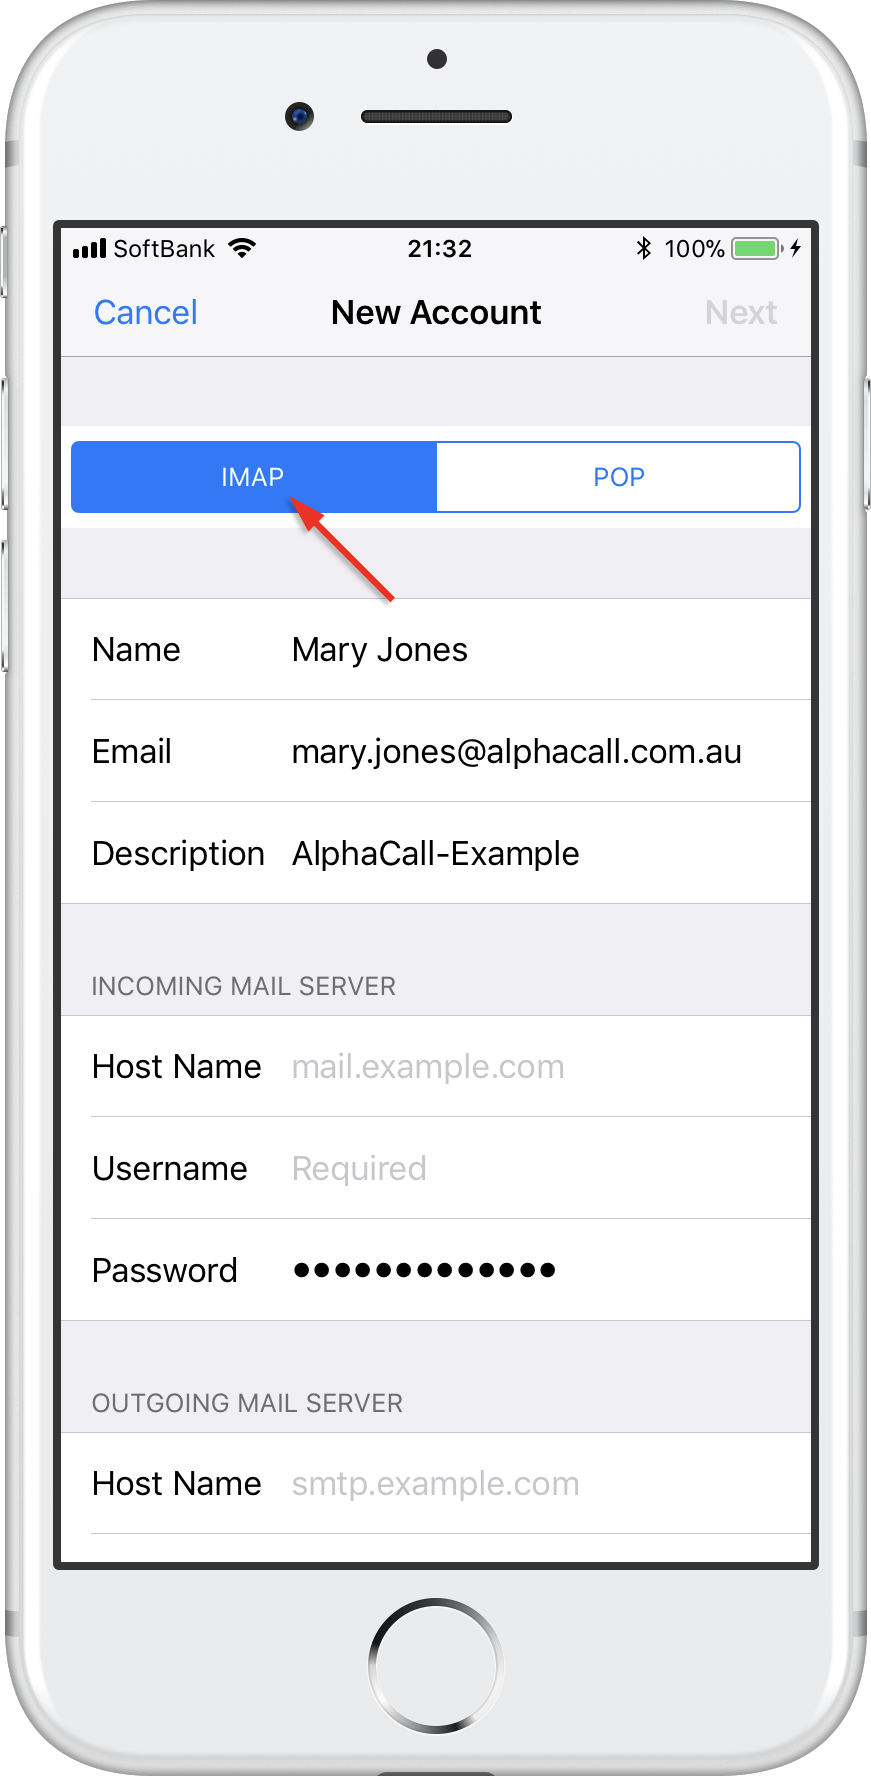
Step 5: Enter your account details.
Enter the account details for the email you want to add:
- Name: this will be visible as the sender.
- Email: the address you want to add.
- Password: you use it to log in to Webmail.
- Description: a name for the account on your device.
Tap Next to continue.
Step 6: Select IMAP.
Tap IMAP as the account type.
Step 7: Enter your server settings
Enter the following settings:
Incoming server:
- Host name: imap.alphacall.com.au
- User name: your email account
- Password: the one you use for Webmail
Outgoing server:
- Host name: smtp.alphacall.com.au
- User name: your email account
- Password: the one you use for Webmail
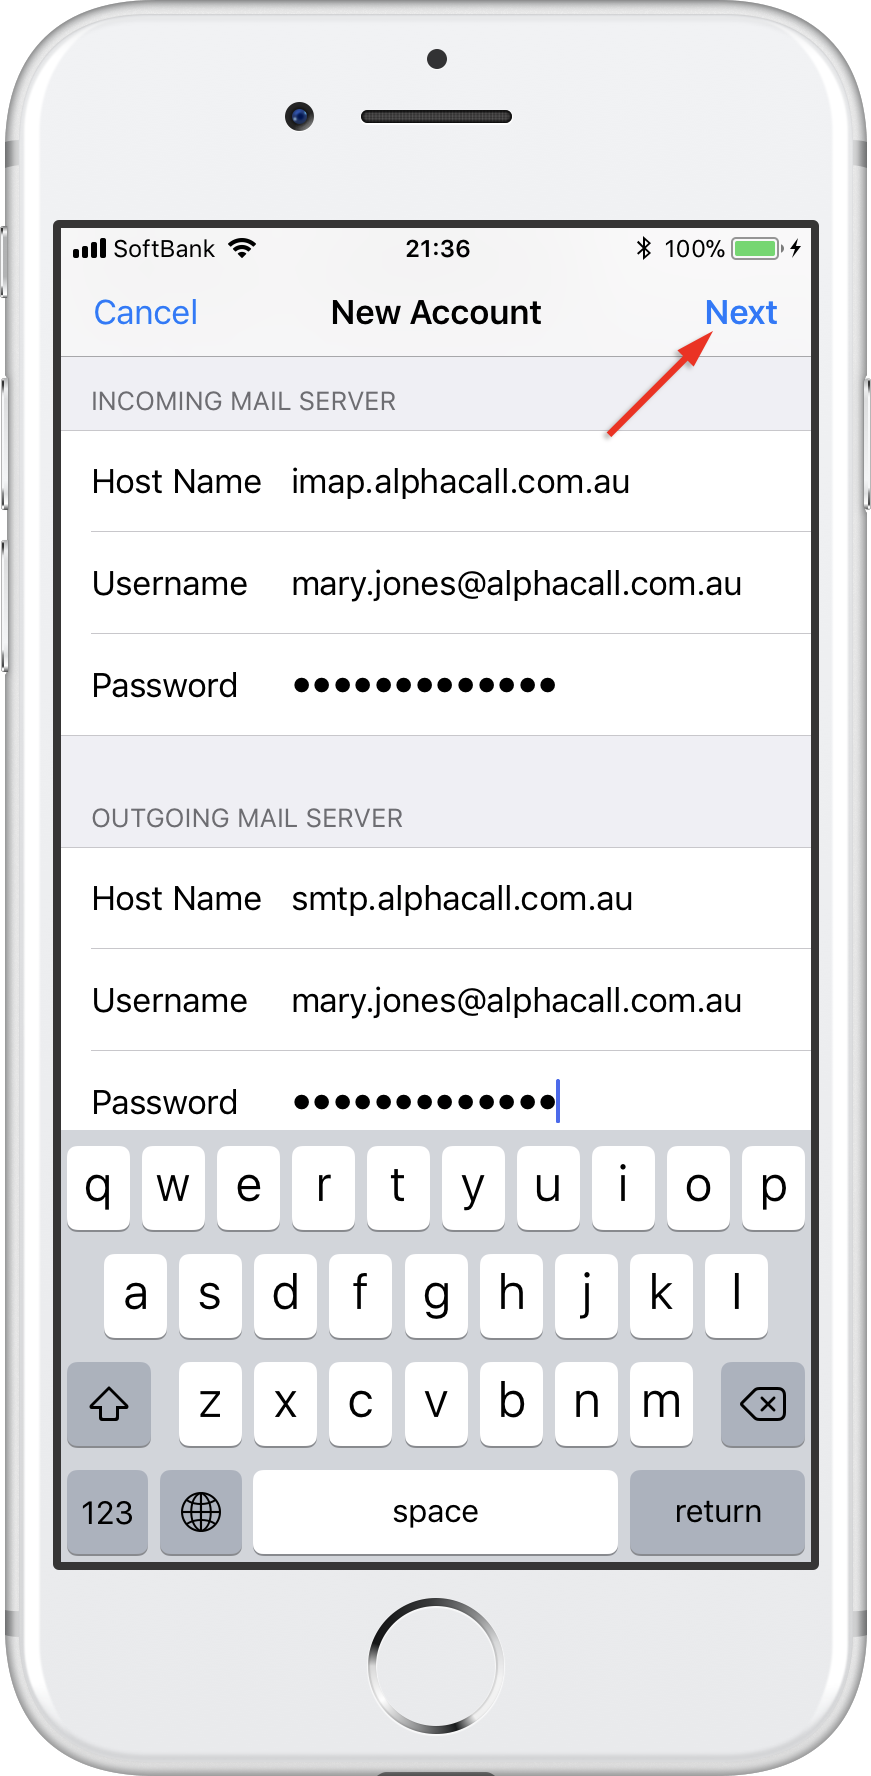
Tap Next to continue.
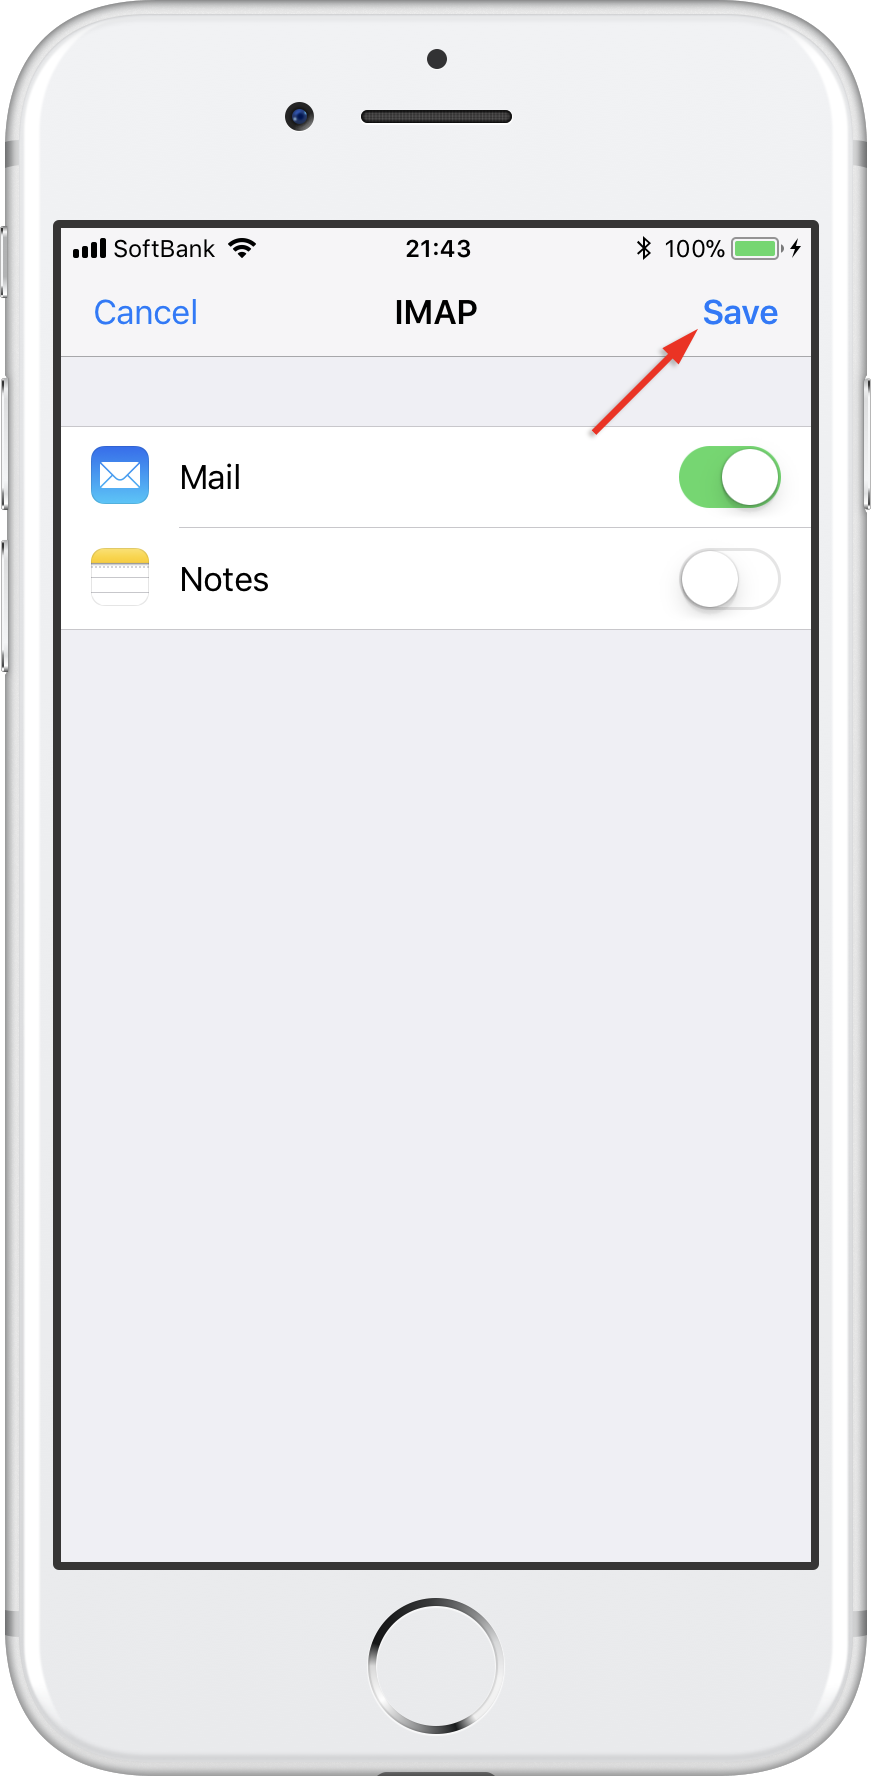
Step 8: Save the account.
Disable syncing of Notes, if this is enabled. Tap Save.
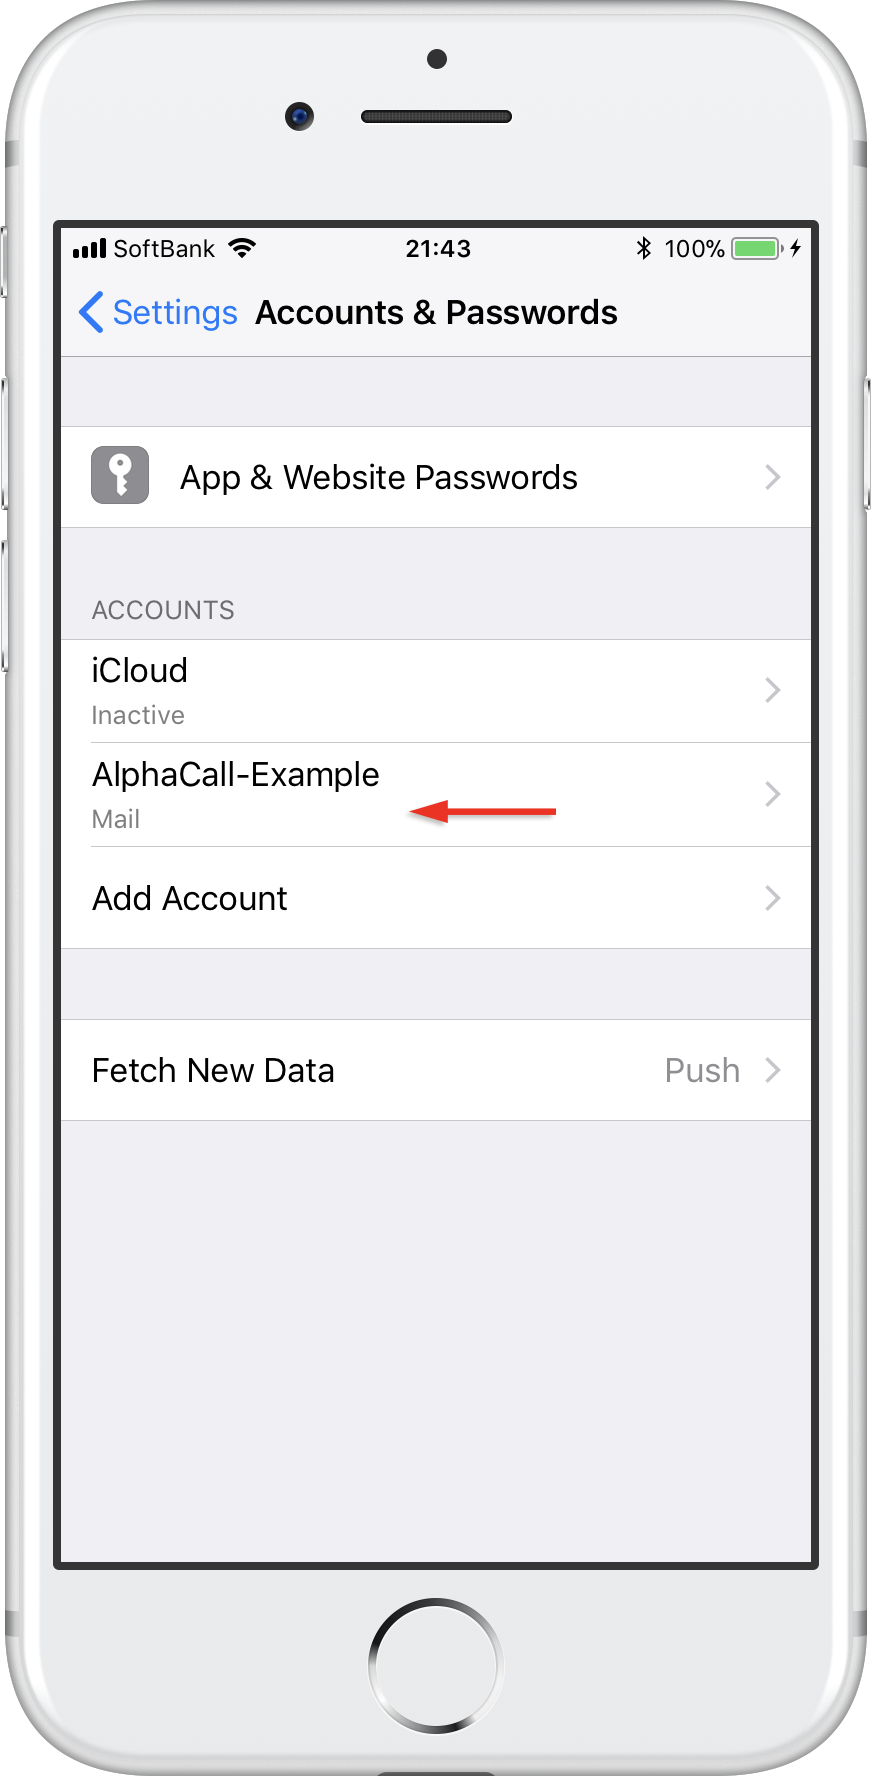
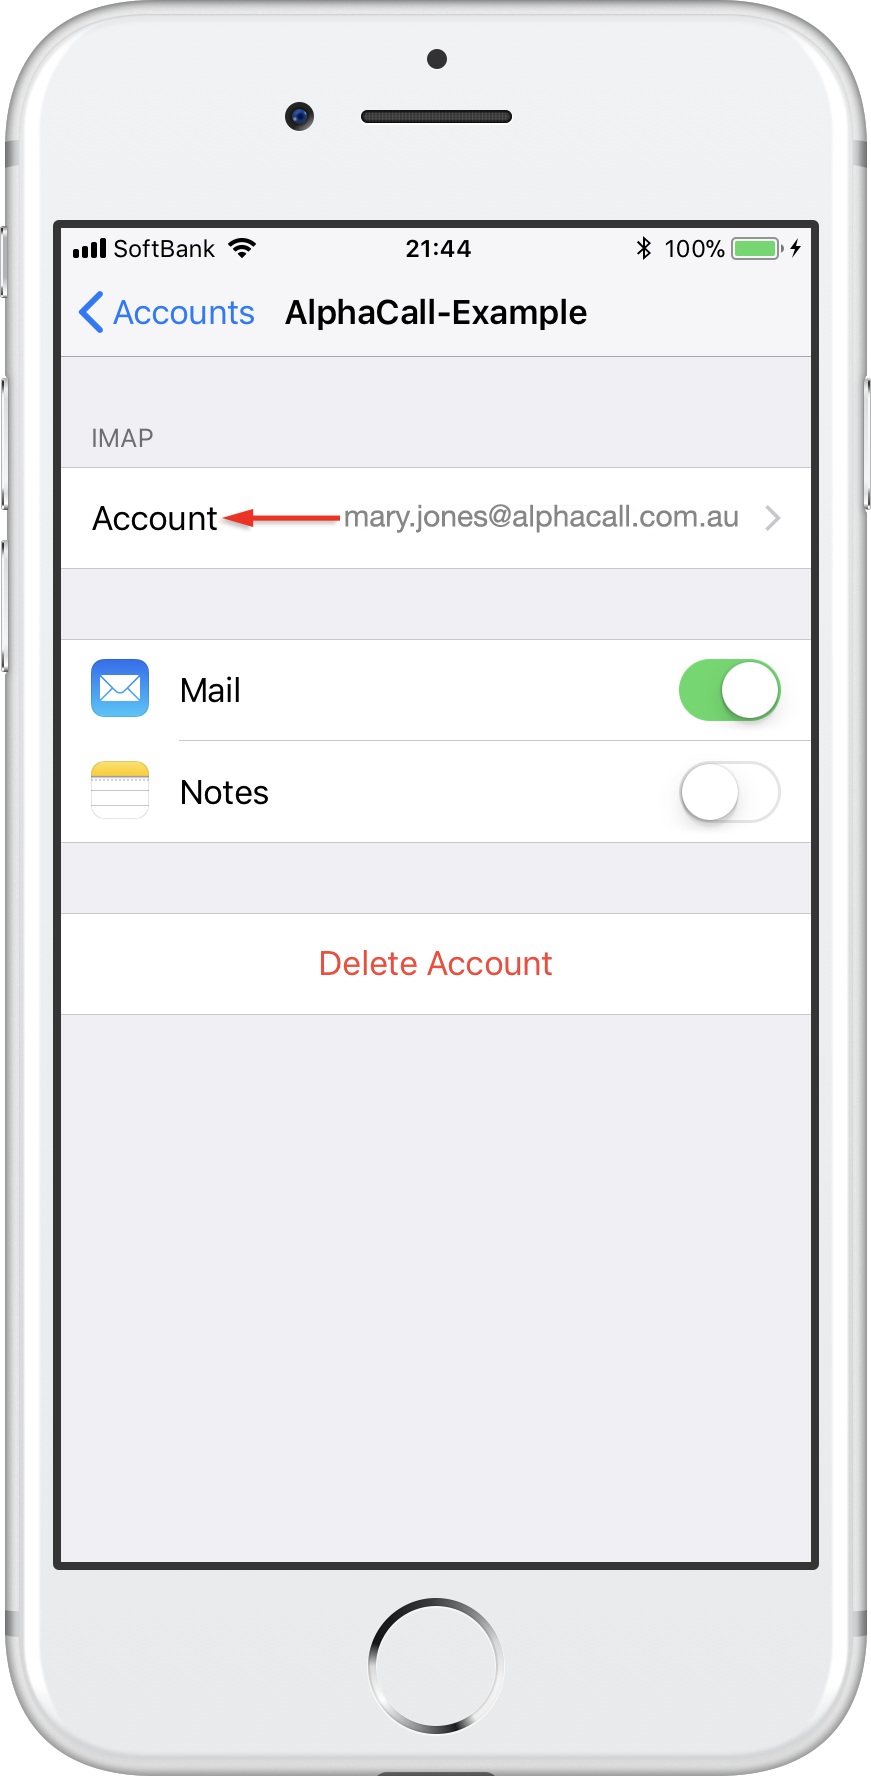
Step 9: Tap the account you added.
Tap the account you just added. You can recognize it by the description.
Step 10: Tap your account again
Tap your account again to open settings.
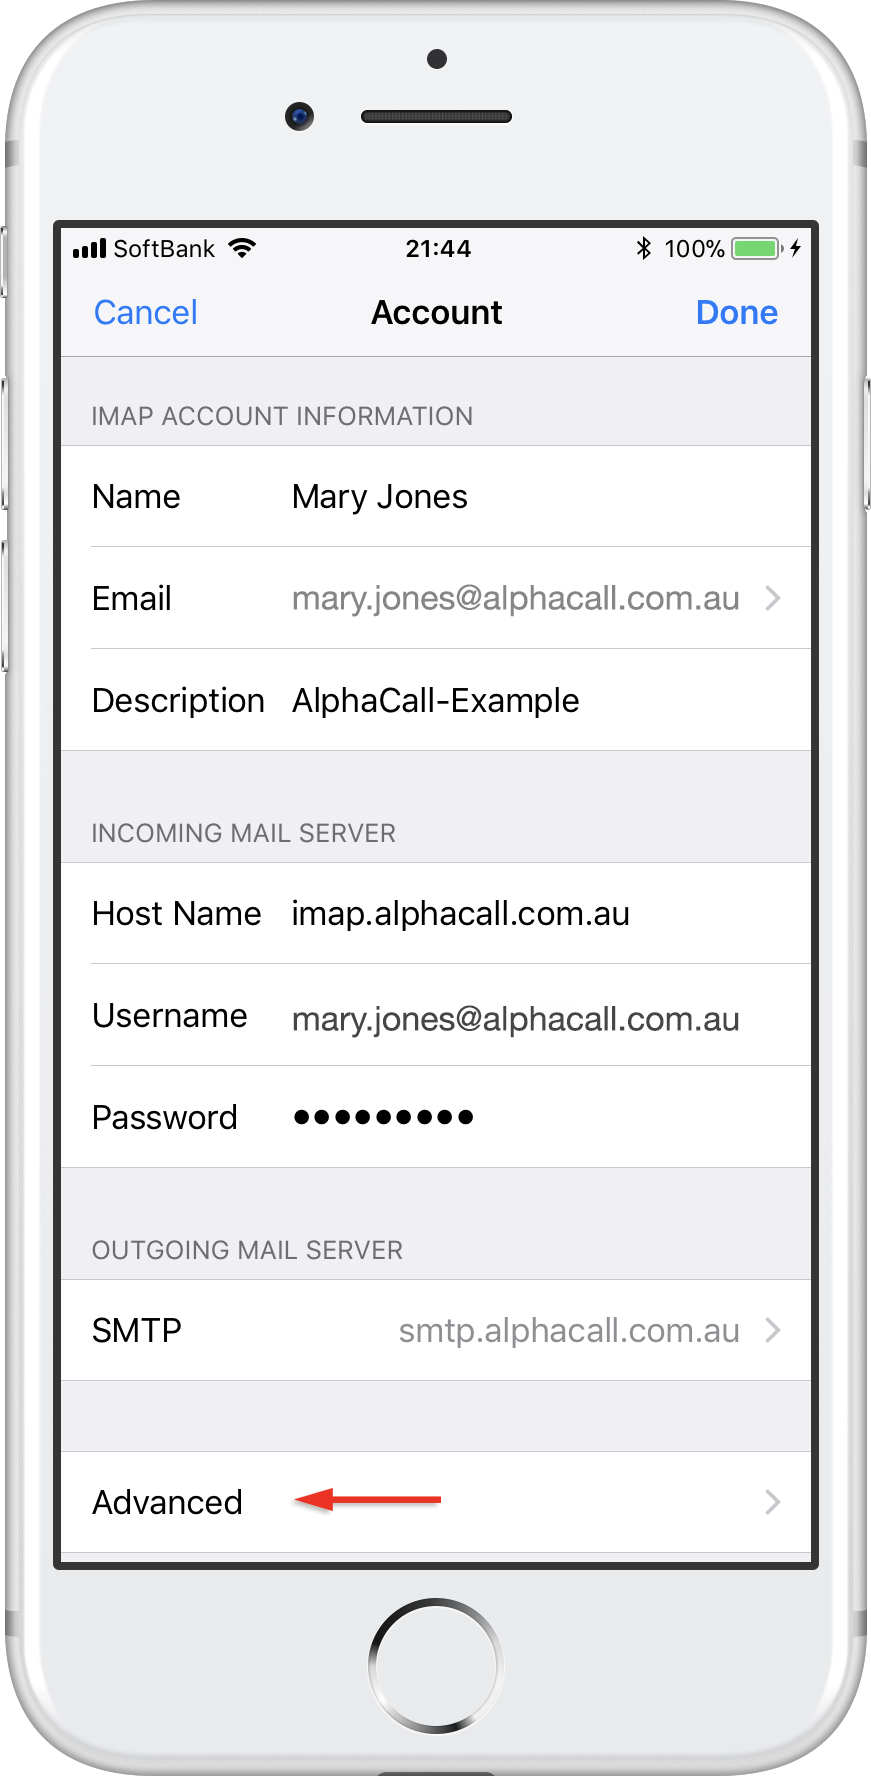
Step 11: Tap Advanced.
Tap Advanced, at the bottom of your screen.
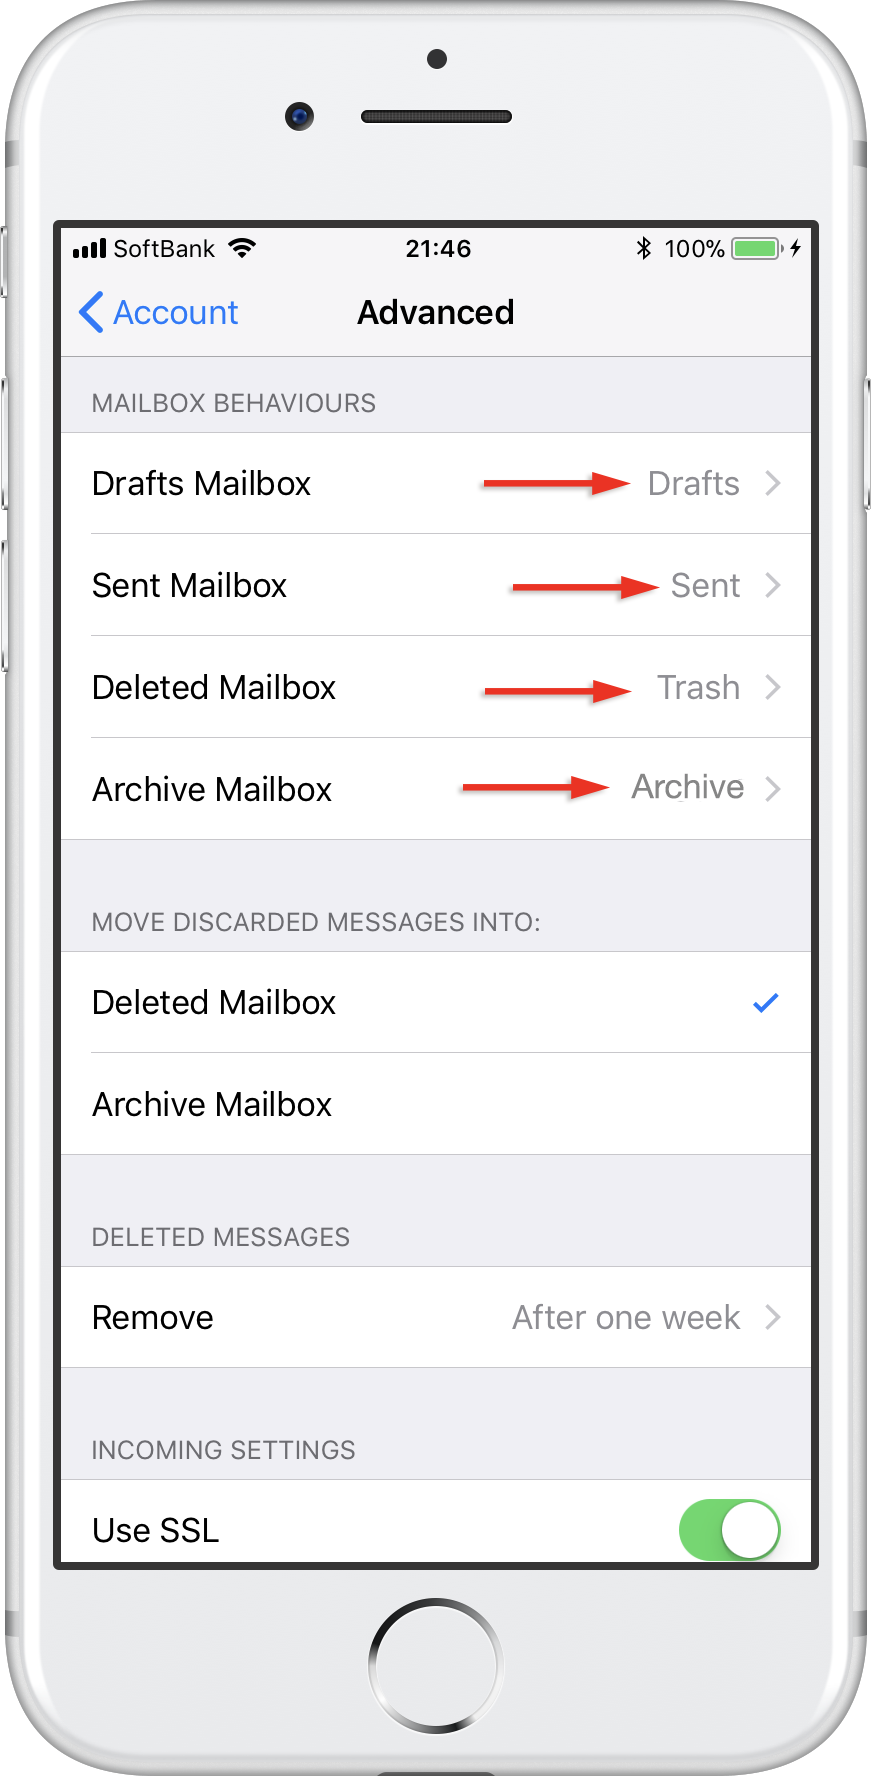
Step 12: Check Mailbox behaviors.
Check if the Mailbox behaviors are set correctly. These settings determine where your emails are saved.
You need to select the following folders on the server:
- Drafts mailbox: Drafts
- Sent mailbox: Sent
- Deleted mailbox: Trash
- Archive mailbox: Archive
If no folder, or a different one is selected, tap the mailbox and select the correct folder on the server. The name of the folder is in English.
Step 13: Enter IMAP Path Prefix.
Scroll down to the bottom of the screen and enter INBOX as IMAP path prefix, all in capitals.

Step 14: Done!
Your account is now set up correctly.
In this guide we show you how to add your email account with IMAP to the mail app on your iPhone with iOS 11.
Step 1: Go to Settings > Accounts & Passwords
Open Settings on your iPhone and tap Accounts & Passwords.
Step 2: Tap Add account.
Tap Add account.
Step 3: Tap Other.
Select Other as account type.
Step 4: Tap Add Mail Account
Tap Add Mail Account.
Step 5: Enter your account details.
Enter the account details for the email you want to add:
- Name: this will be visible as the sender.
- Email: the address you want to add.
- Password: you use it to log in to Webmail.
- Description: a name for the account on your device.
Tap Next to continue.
Step 6: Select IMAP.
Tap IMAP as the account type.
Step 7: Enter your server settings
Enter the following settings:
Incoming server:
- Host name: imap.alphacall.com.au
- User name: your email account
- Password: the one you use for Webmail
Outgoing server:
- Host name: smtp.alphacall.com.au
- User name: your email account
- Password: the one you use for Webmail
Tap Next to continue.
Step 8: Save the account.
Disable syncing of Notes, if this is enabled. Tap Save.
Step 9: Tap the account you added.
Tap the account you just added. You can recognize it by the description.
Step 10: Tap your account again
Tap your account again to open settings.
Step 11: Tap Advanced.
Tap Advanced, at the bottom of your screen.
Step 12: Check Mailbox behaviors.
Check if the Mailbox behaviors are set correctly. These settings determine where your emails are saved.
You need to select the following folders on the server:
- Drafts mailbox: Drafts
- Sent mailbox: Sent
- Deleted mailbox: Trash
- Archive mailbox: Archive
If no folder, or a different one is selected, tap the mailbox and select the correct folder on the server. The name of the folder is in English.
Step 13: Enter IMAP Path Prefix.
Scroll down to the bottom of the screen and enter INBOX as IMAP path prefix, all in capitals.
Step 14: Done!
Your account is now set up correctly.
How to Set up Your Android Phone for POP3 Email
In this guide will show you how to set up your Android Phone for POP3 email.
IMPORTANT: The look and features of Android OS can vary depending on which device you have. If these instructions don't work for you, please refer to the manufacturer's website or search online for support information on the mail app.
The device used for this guide is Samsung Galaxy J3.
While setting up, you'll need the relevant email settings.
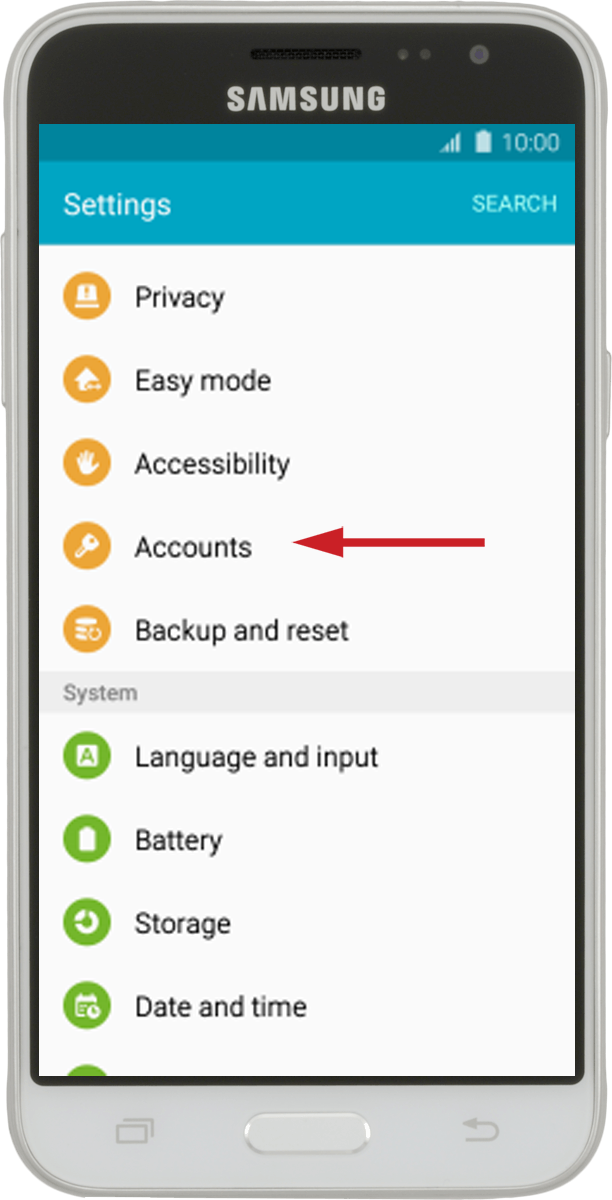
Step 1: Find Accounts
Slide your finger downwards starting from the top of the screen.

Press the settings icon.
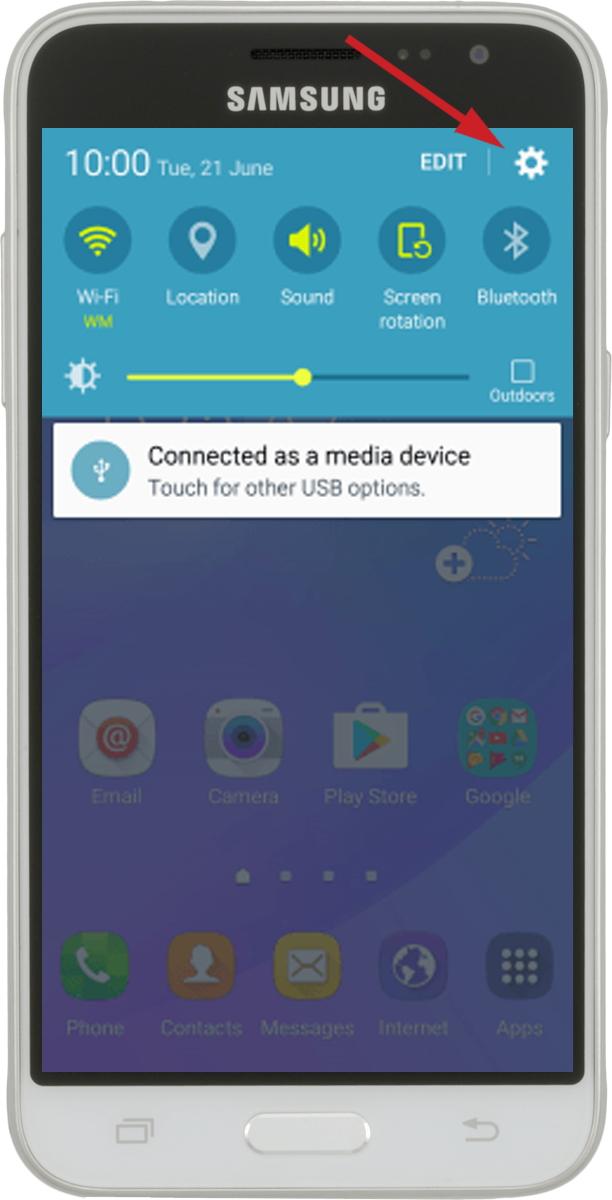
Press Accounts.
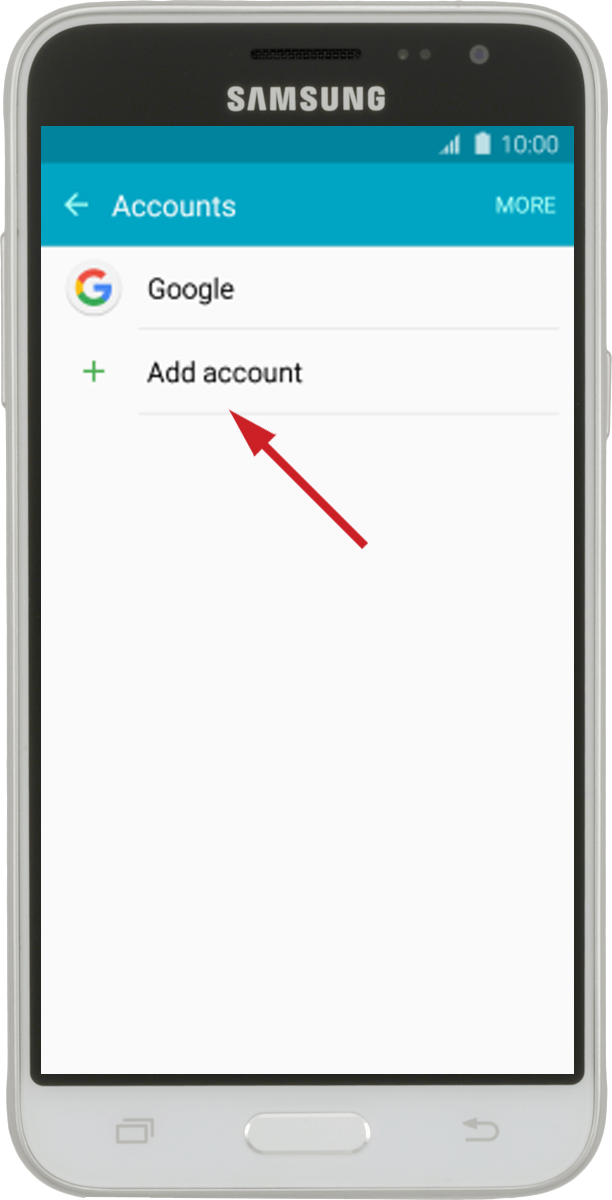
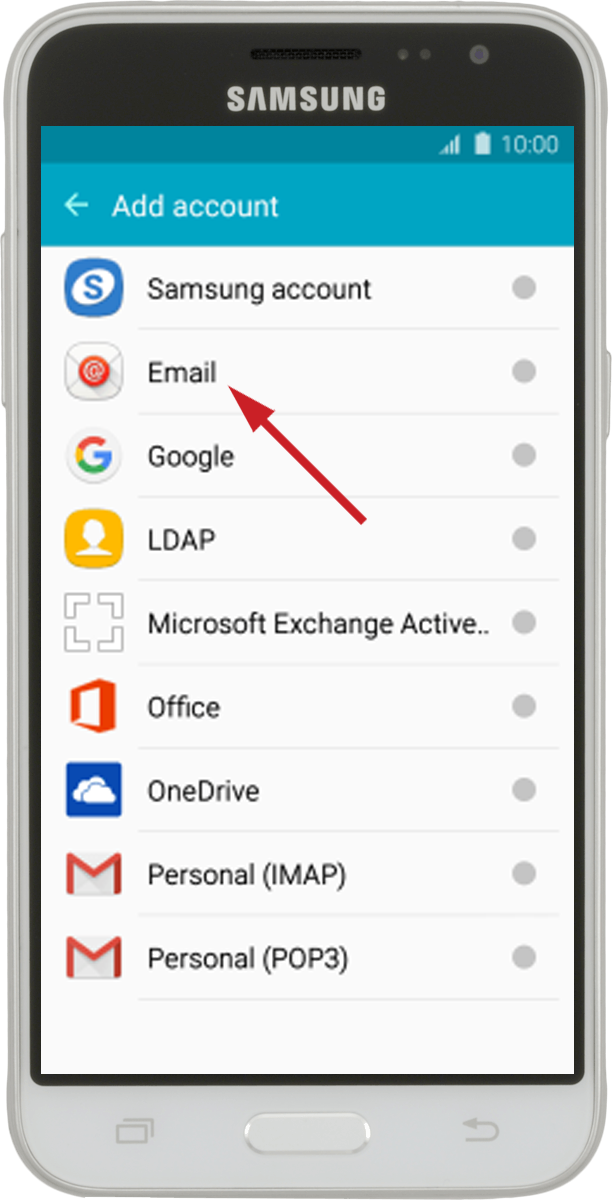
Step 2: Create new email account
Press Add account.
Press Email.
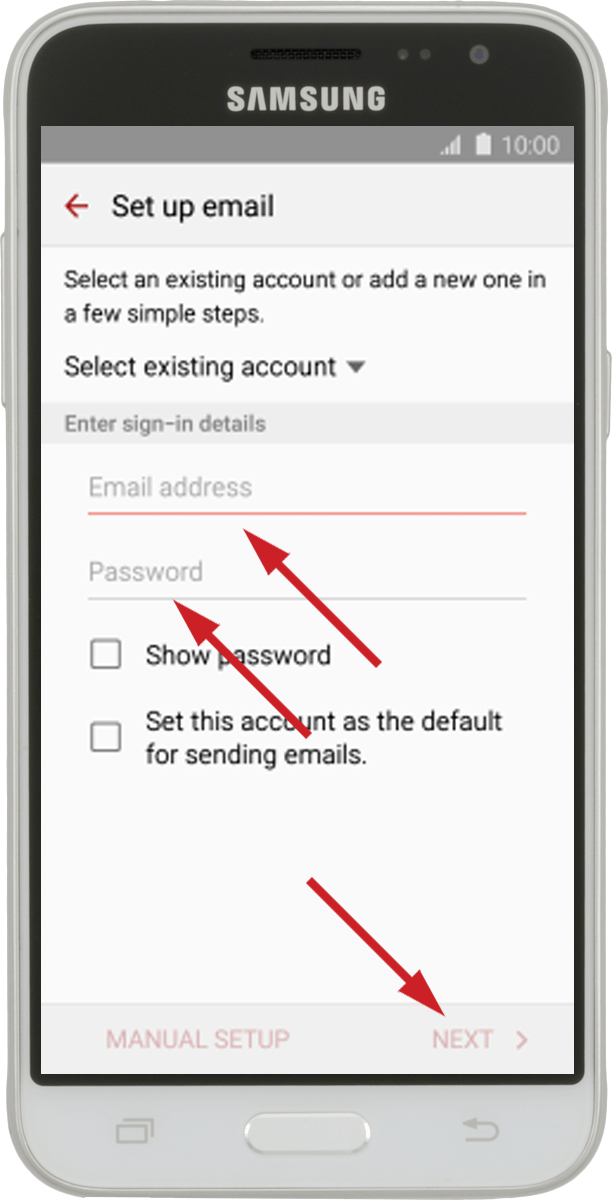
Step 3: Enter email address and password
Press Email address and key in your email address. Next, enter the password below. Then, click NEXT.
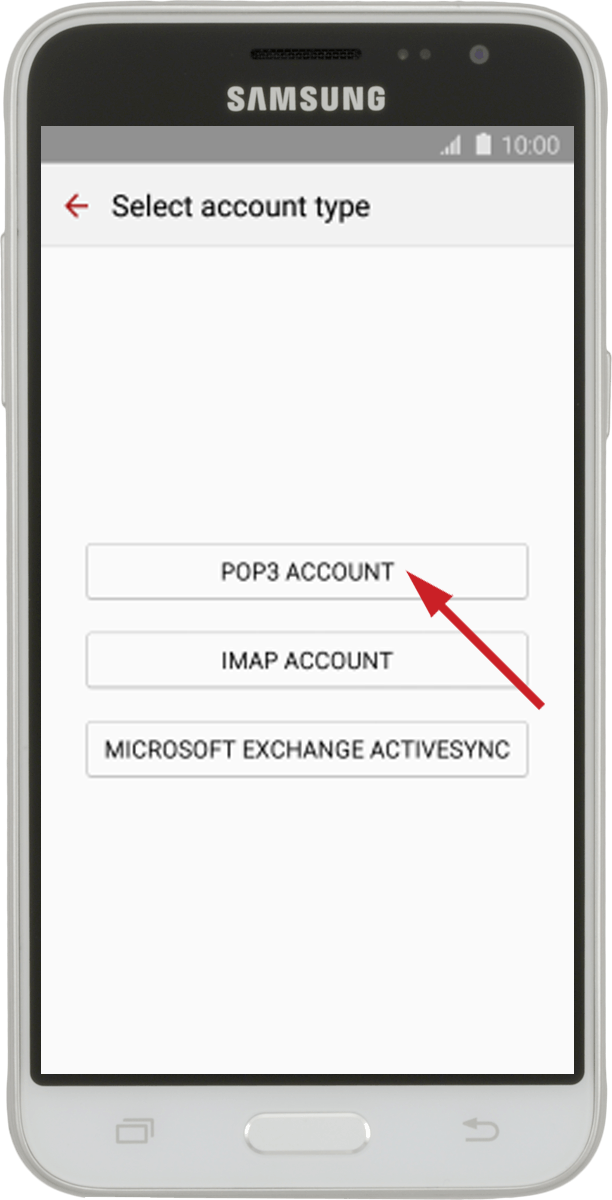
Step 4: Select server type
Press POP3 ACCOUNT.
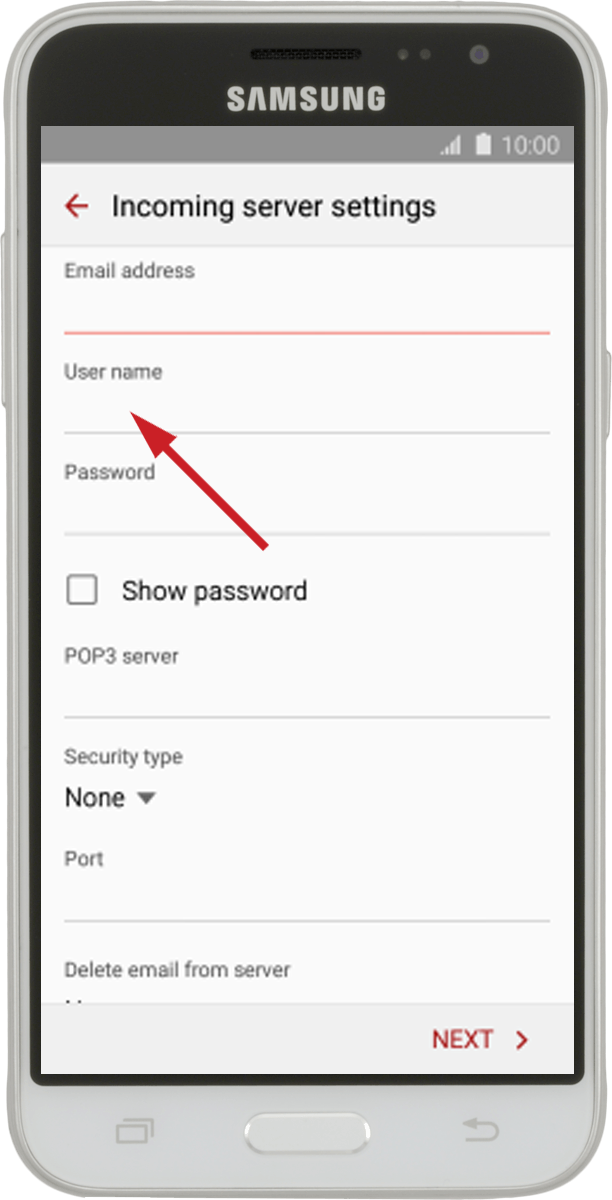
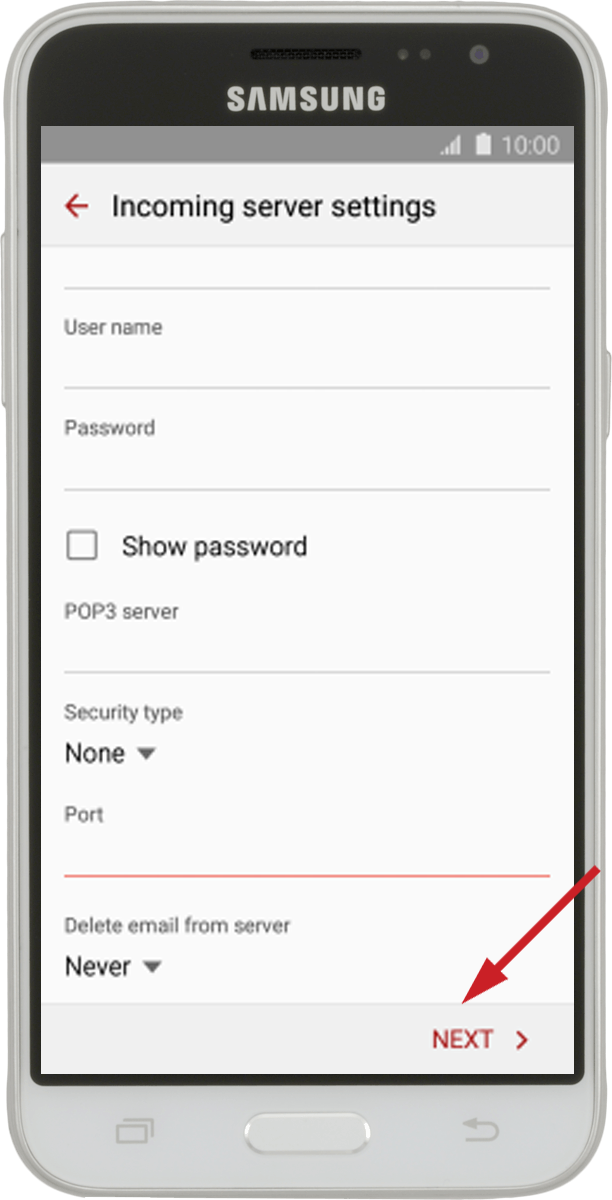
Step 5: Enter username
Press the field below "User name" and key in the username for your email account.
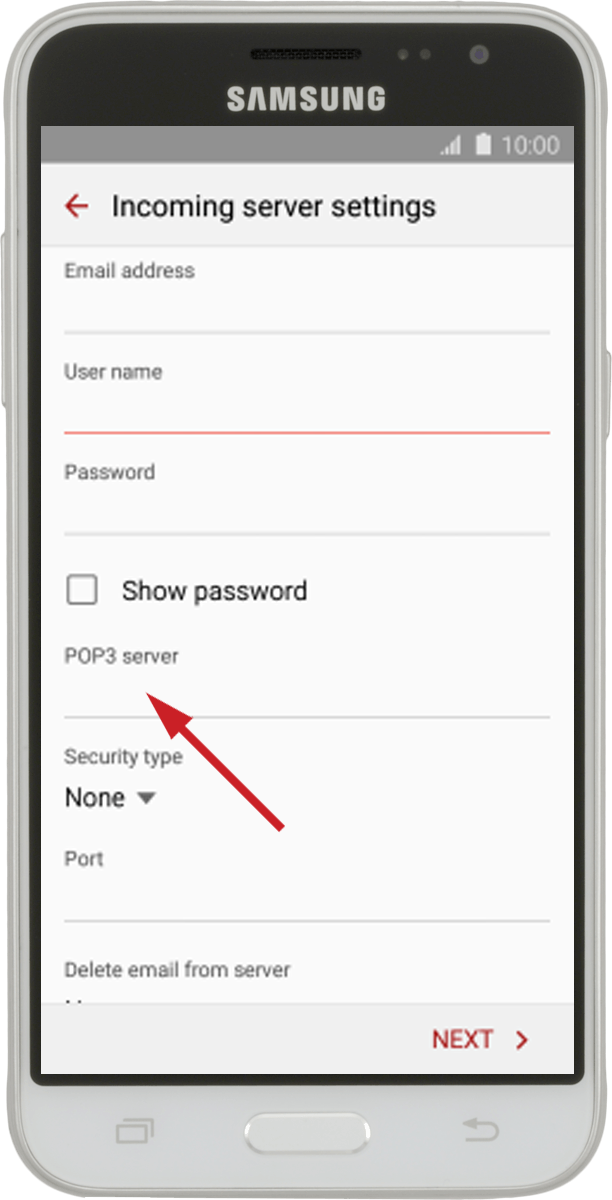
Step 6: Enter incoming server
Press the field below "POP3 server" and key in the name of your email provider's incoming server.
Step 7: Turn off encryption of incoming email
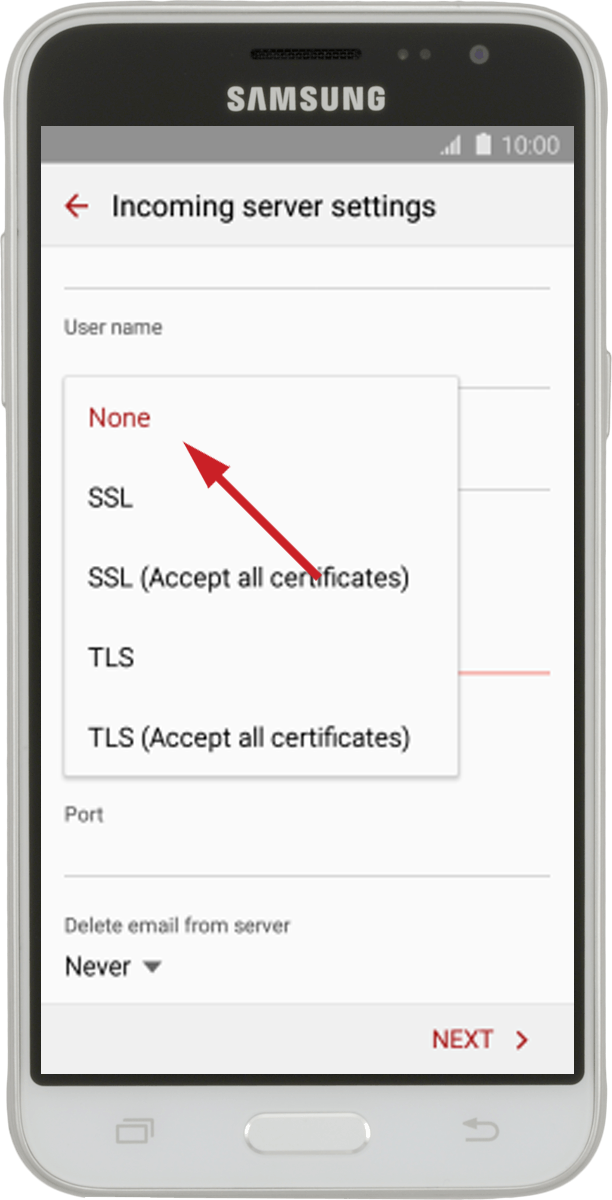
Press the drop down list below "Security type".
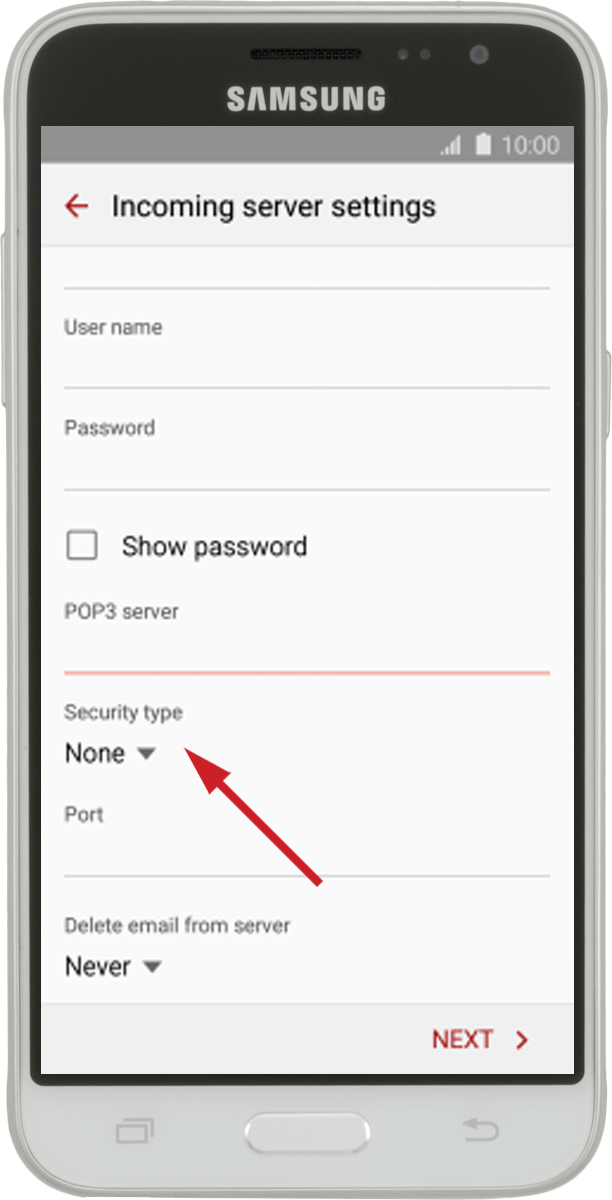
Press None to turn off the function.
Step 8: Enter incoming port
Press the field below "Port" and key in 110.

Step 9: Turn deletion of email on server on or off
Press the drop down list below "Delete email from server".
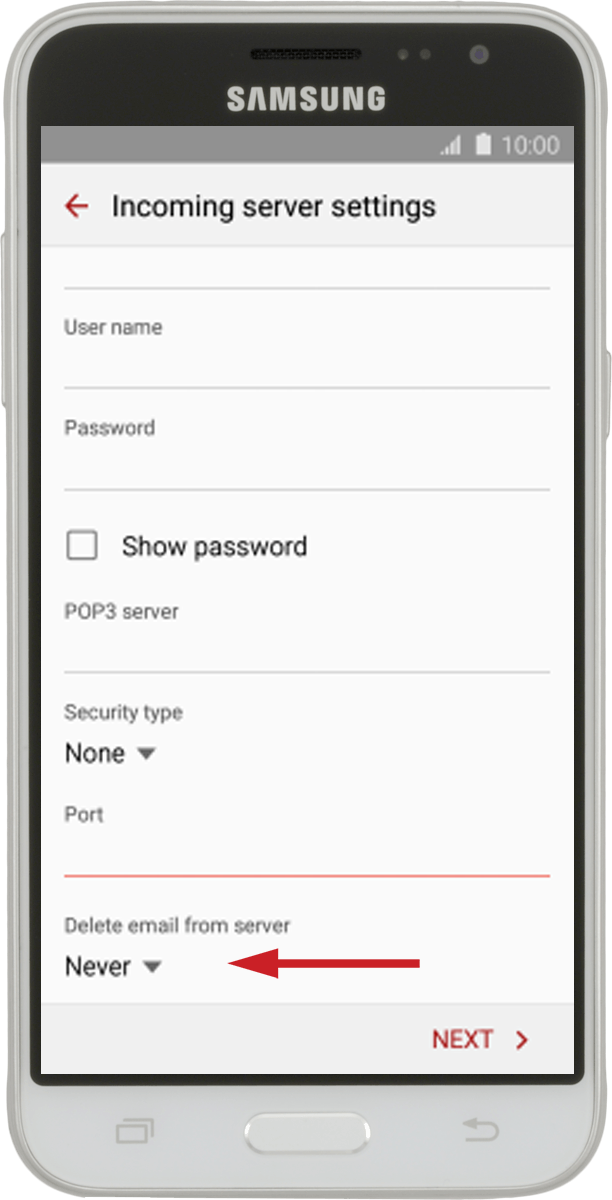
Press Never to keep email on the server when you delete them on your phone.
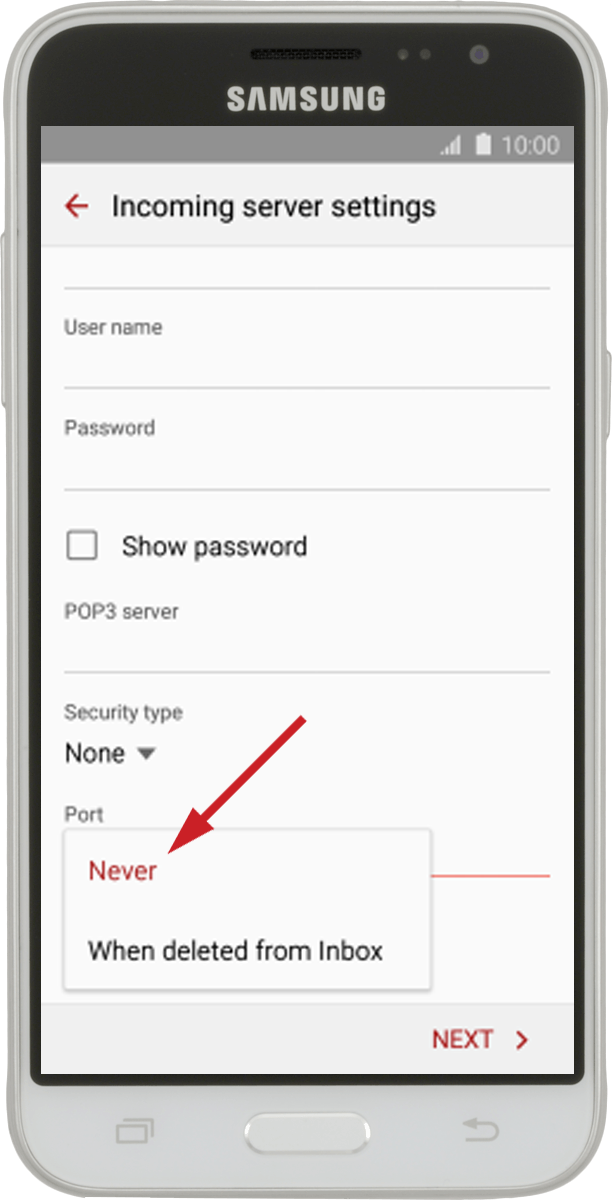
Press When deleted from Inbox to delete email on the server when you delete them on your phone.

Press NEXT.
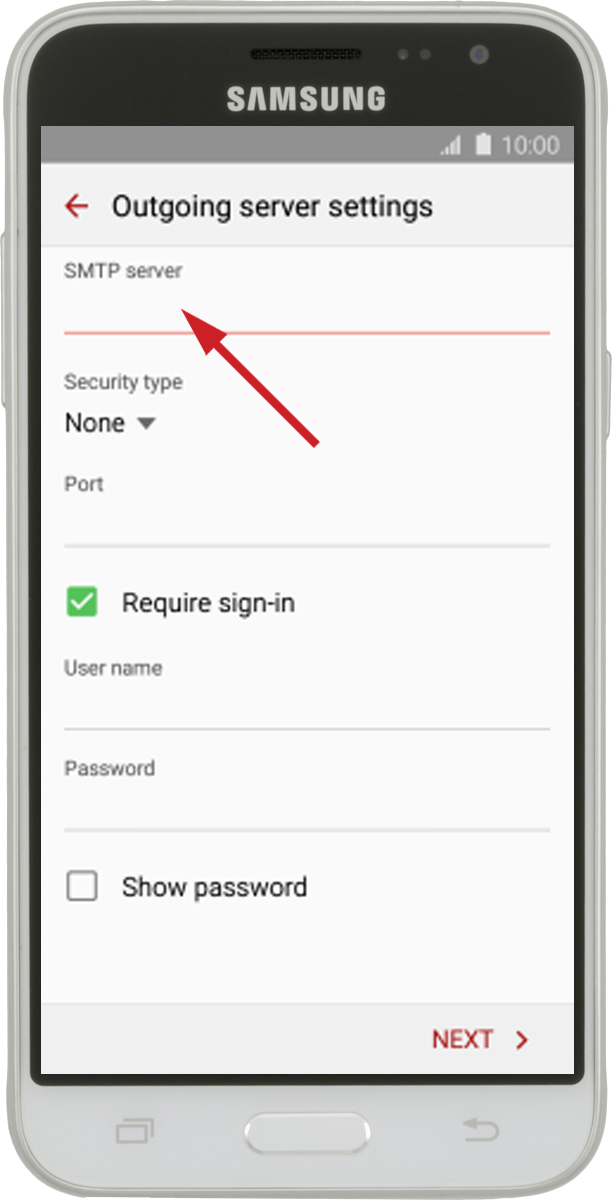
Step 10: Enter outgoing server
Press the field below "SMTP server" and key in the name of your email provider's outgoing server.
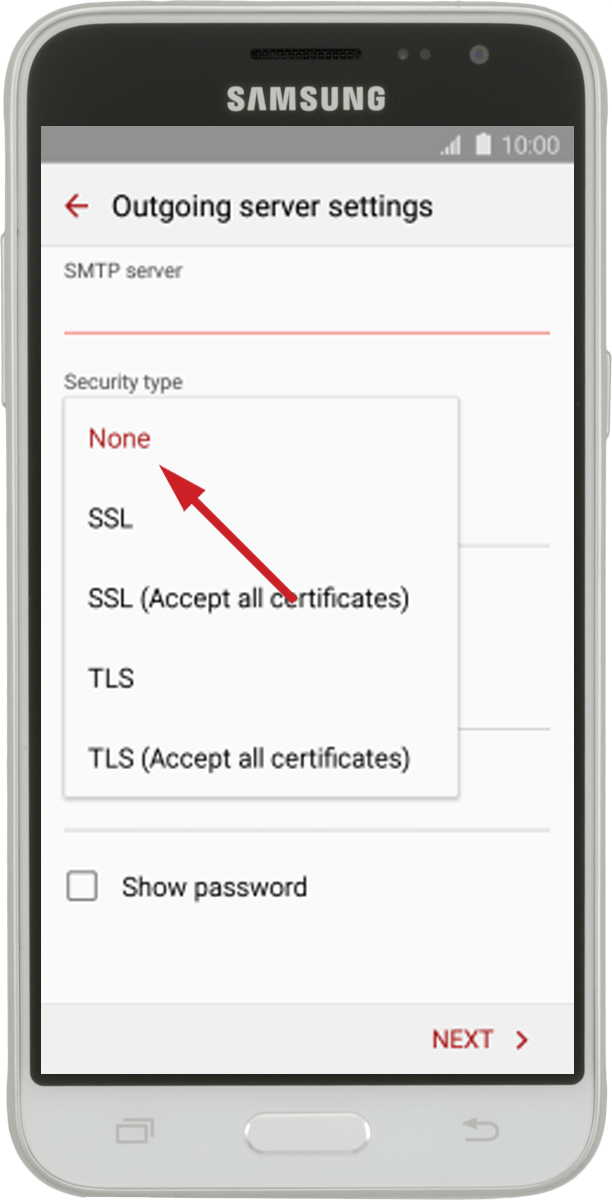
Step 11: Turn off encryption of outgoing email
Press the drop down list below "Security type".
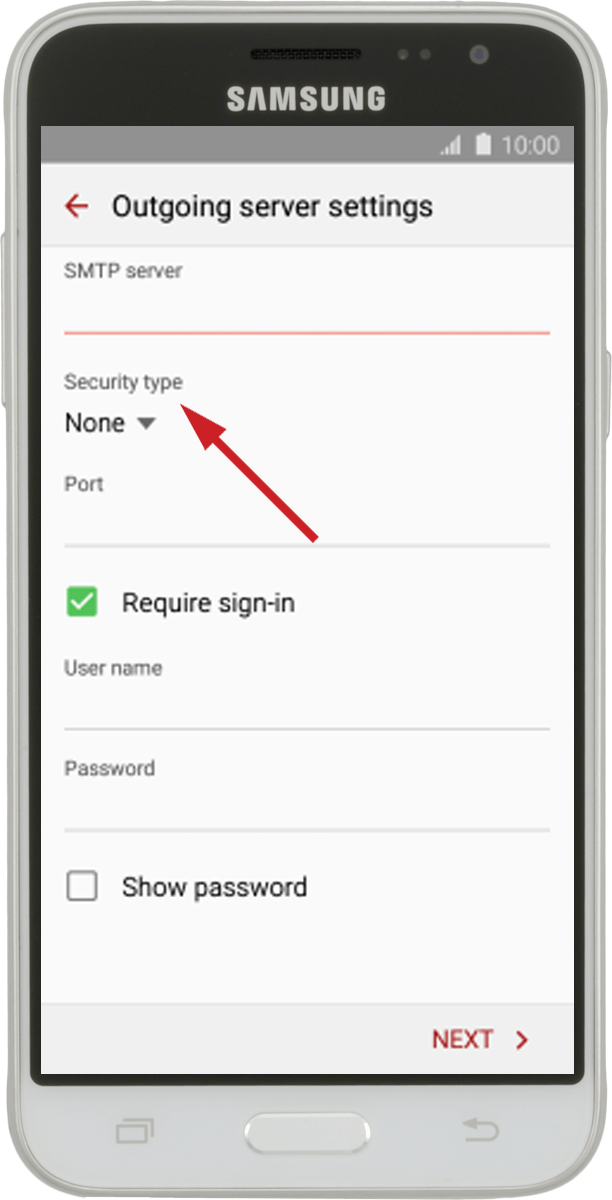
Press None to turn off the function.
Step 12: Enter outgoing port
Press the field below "Port" and key in 25.
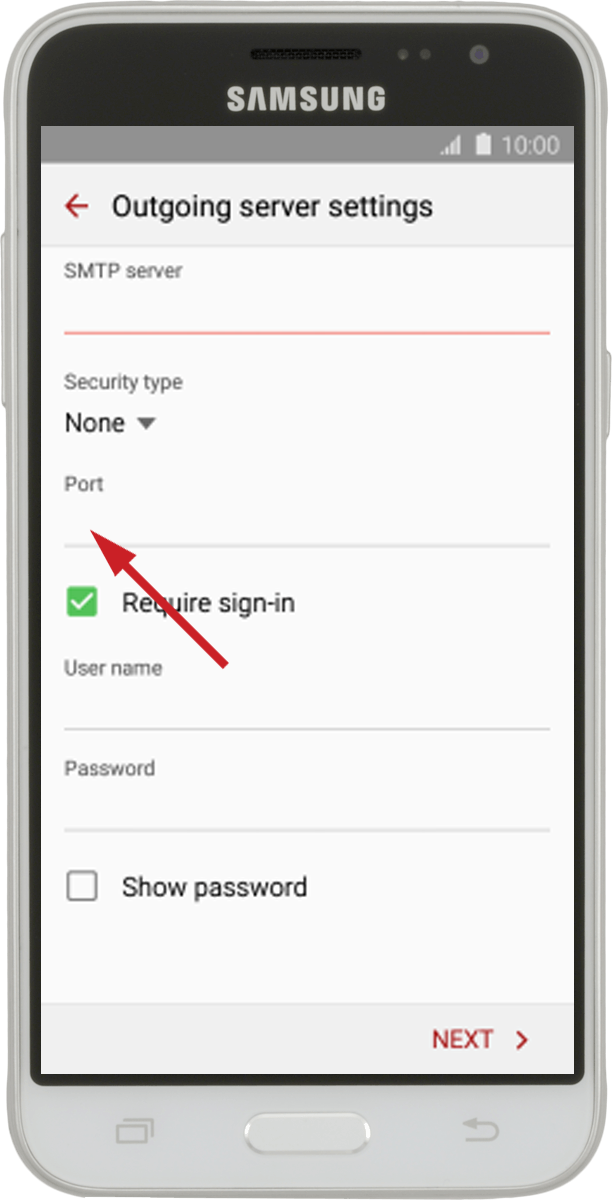
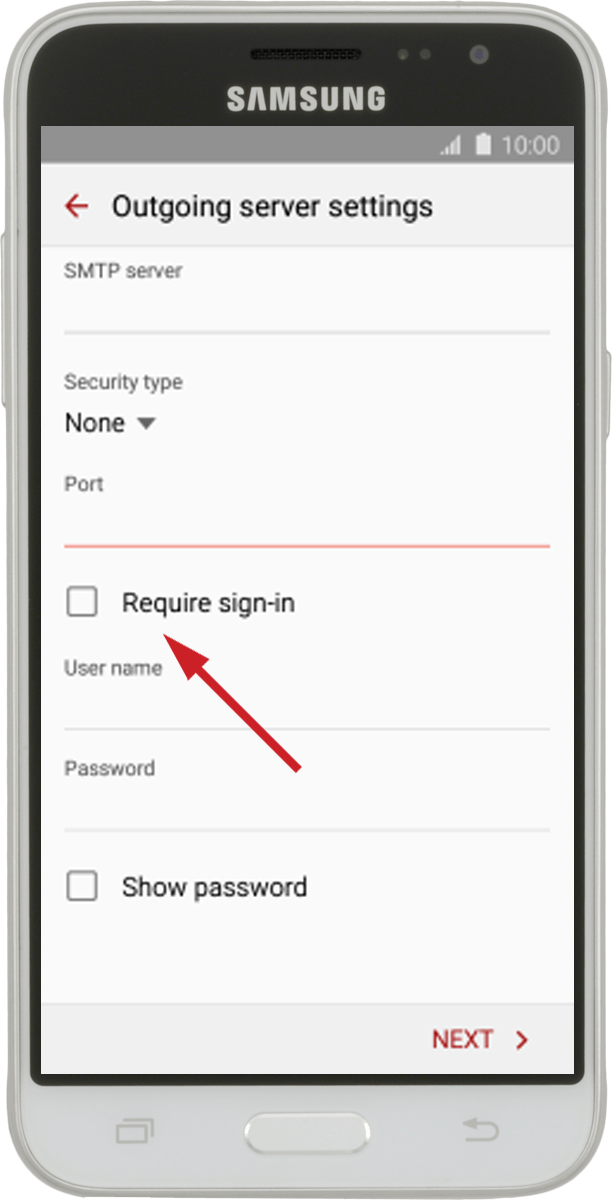
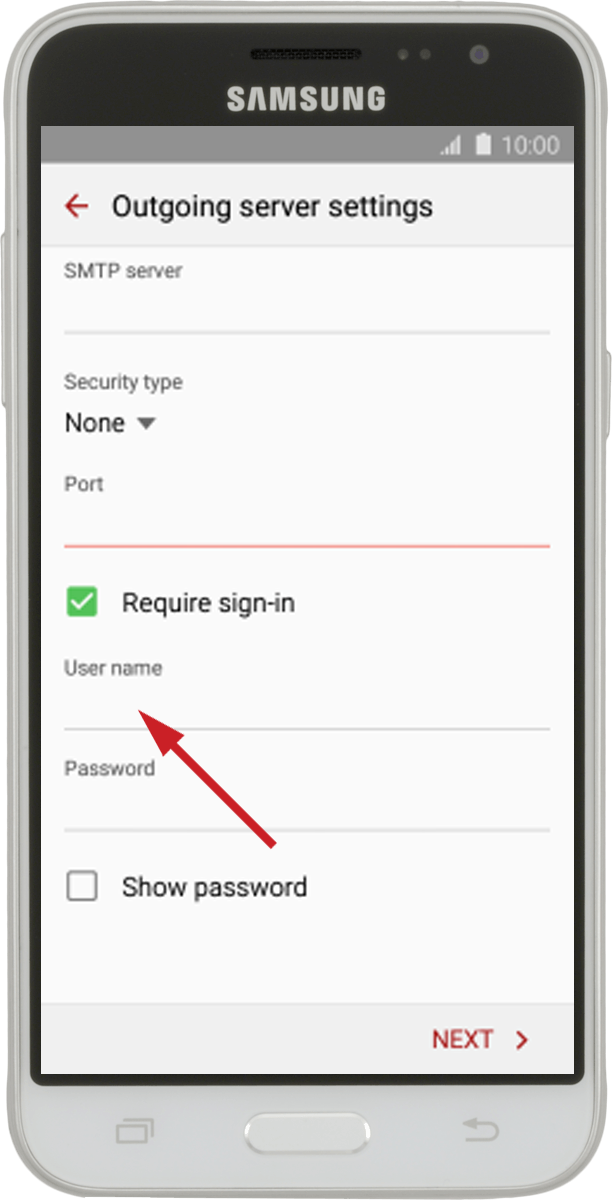
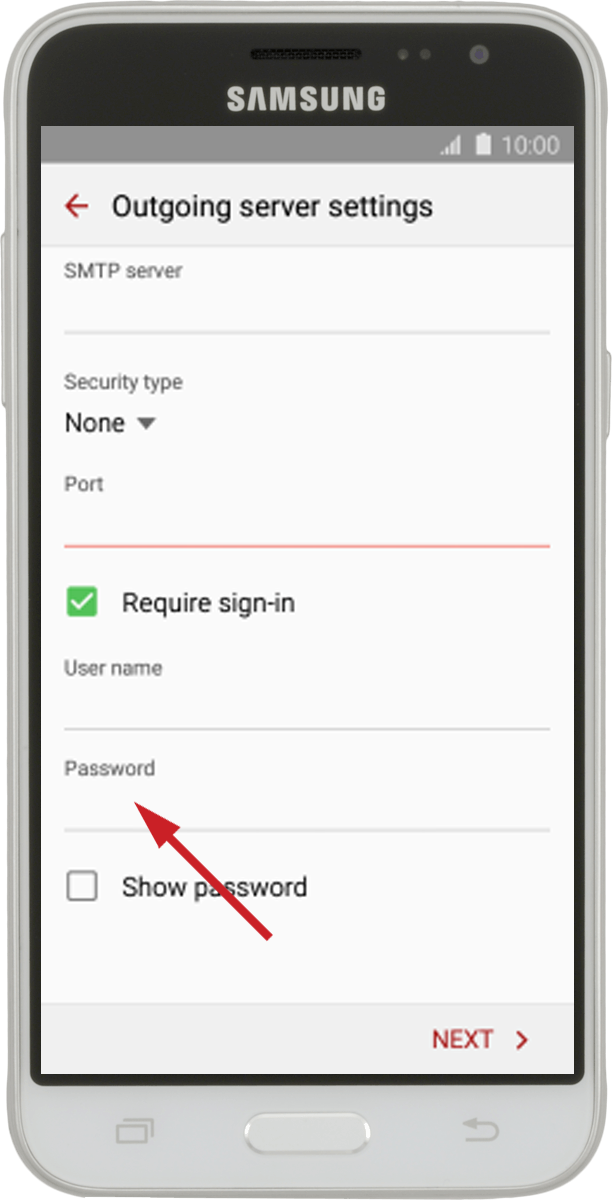
Step 13: Turn on SMTP authentication
Press Require sign-in to turn on the function.
Press the field below User name and key in the username for your email provider's outgoing server.
Press the field below Password and key in the password for your email provider's outgoing server. Then press NEXT.
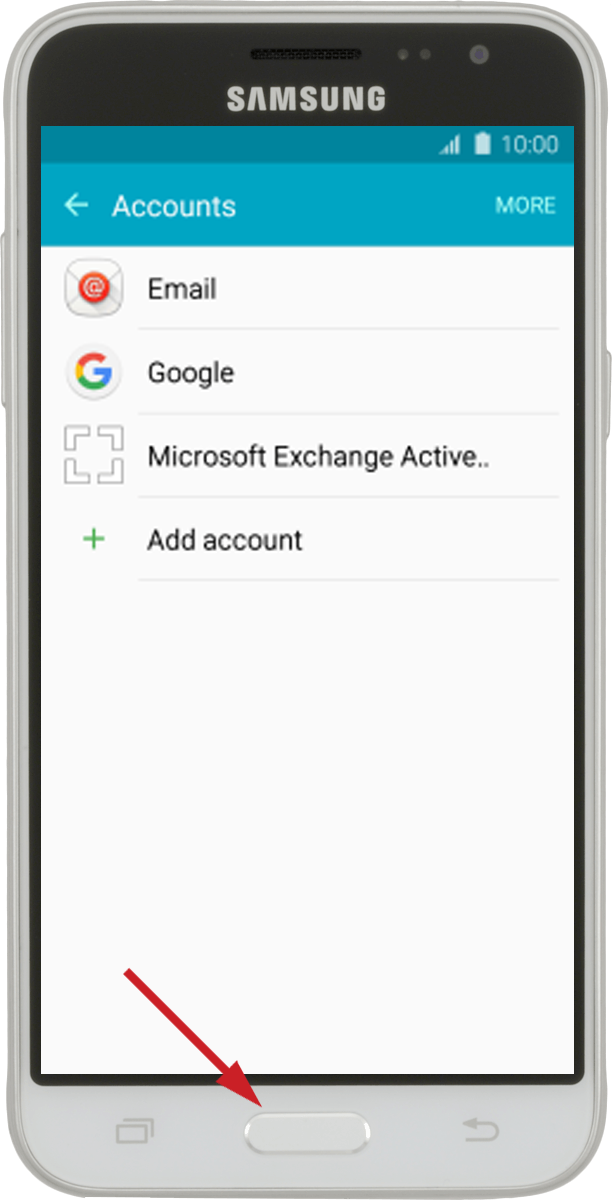
Step 14: Return to the home screen
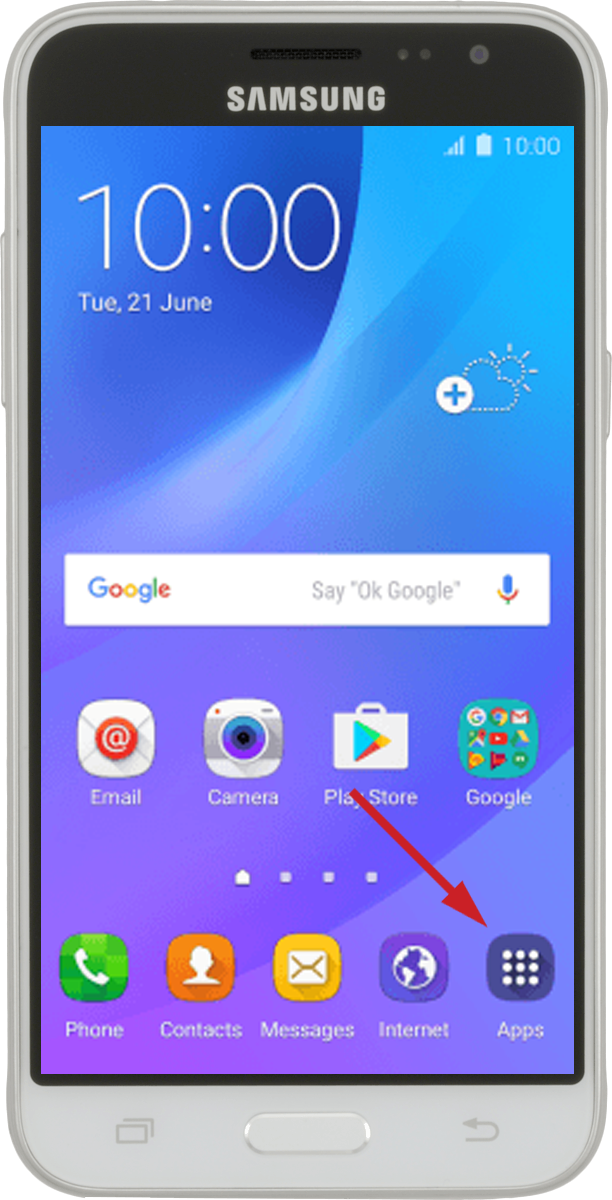
Press the Home key to return to the home screen.
Press Apps.
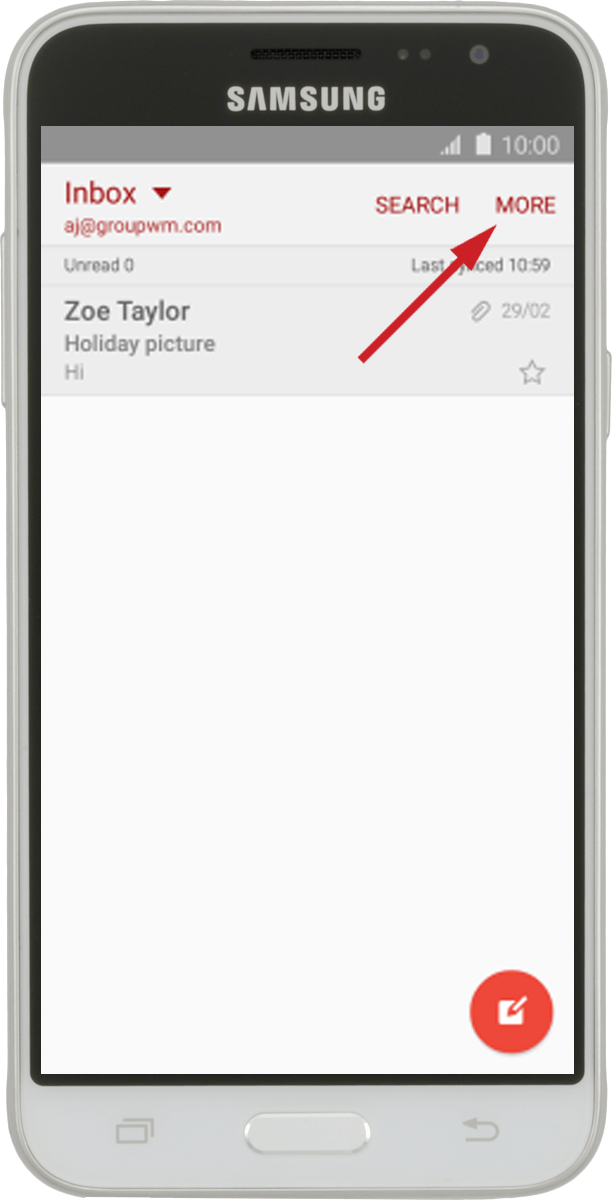
Press Email.

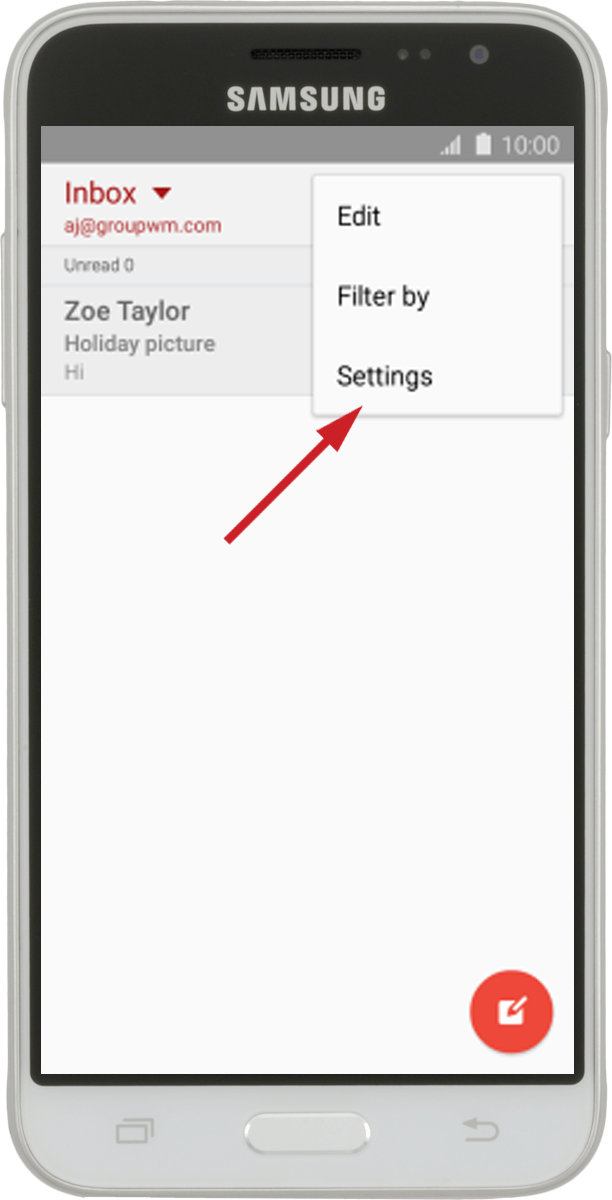
Press MORE.
Press Settings.
Press the required account.
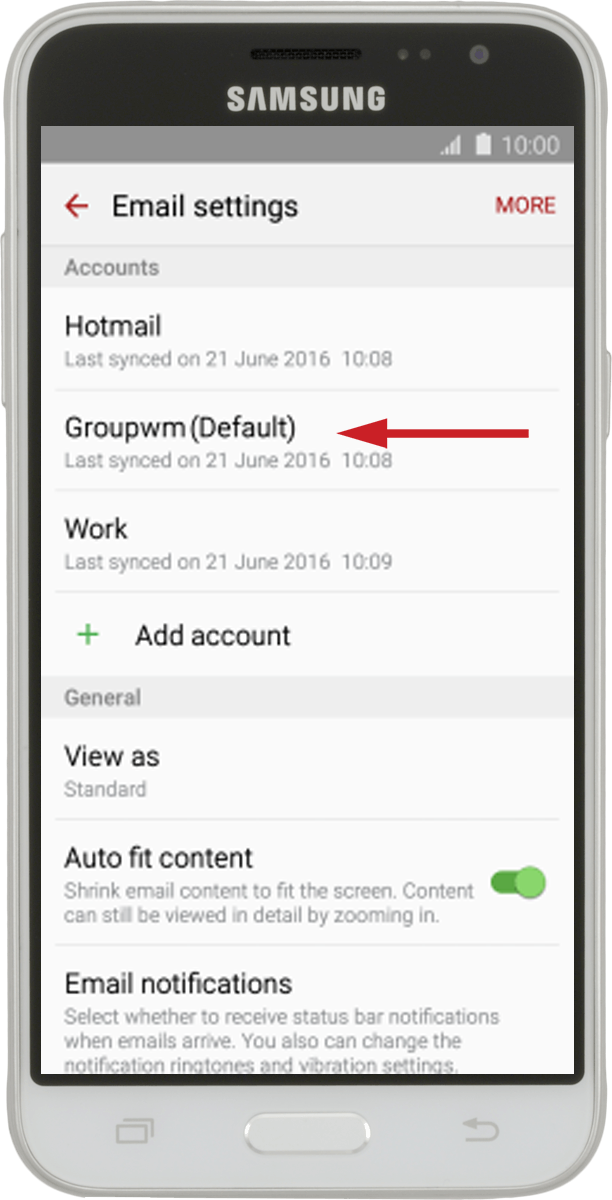
Step 15: Enter email account name
Press Account name.
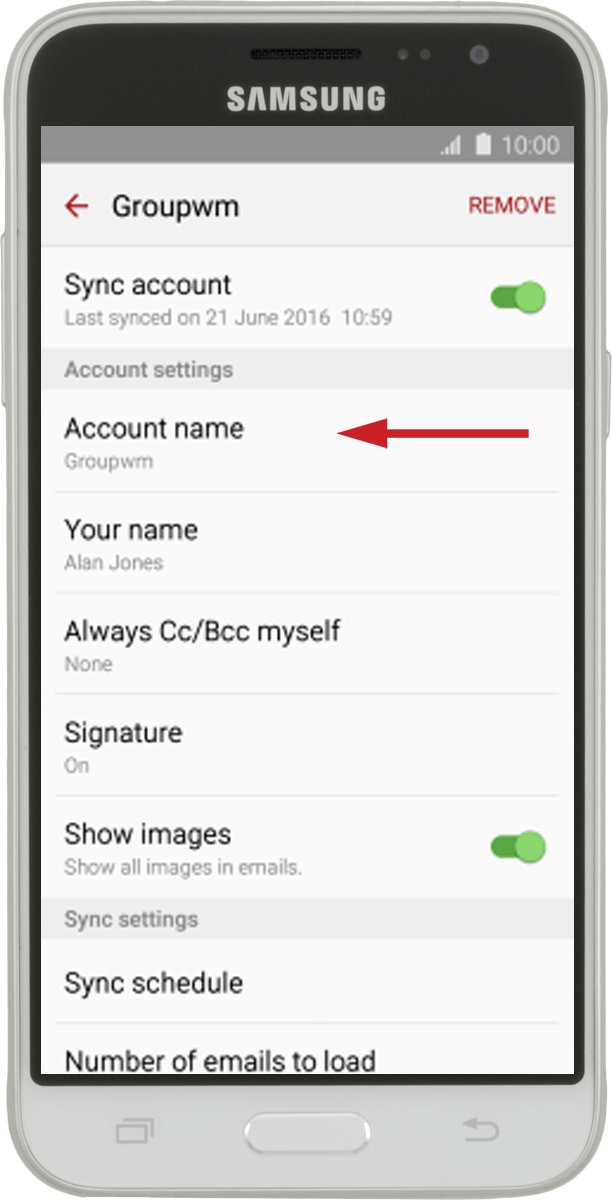
Key in the required name and press OK.

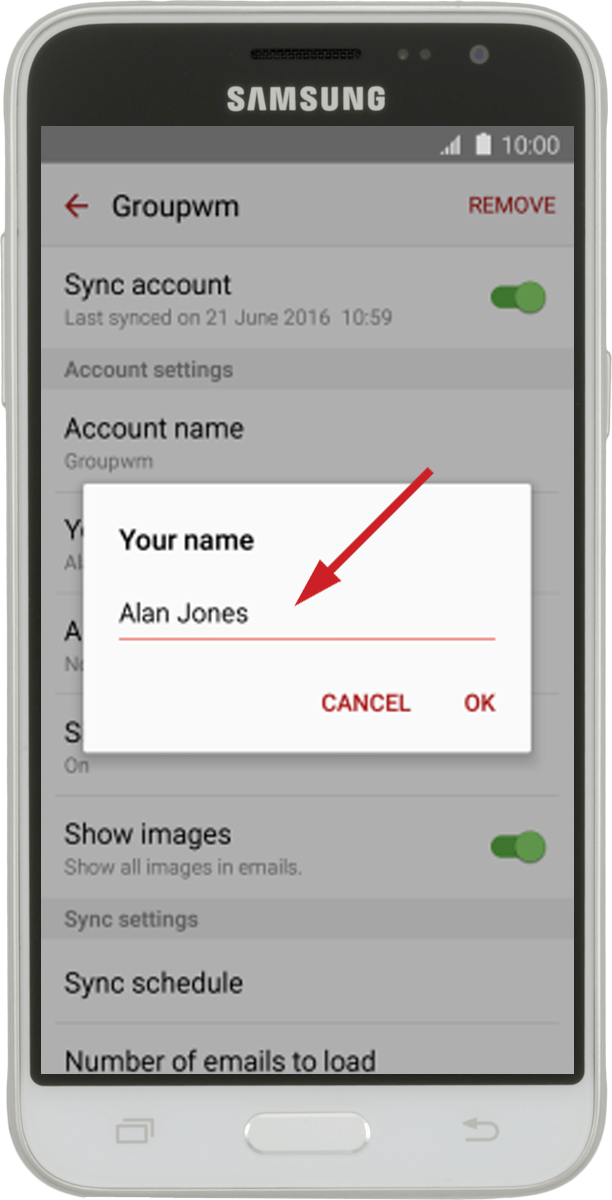
Step 16: Key in sender name
Press Your name.
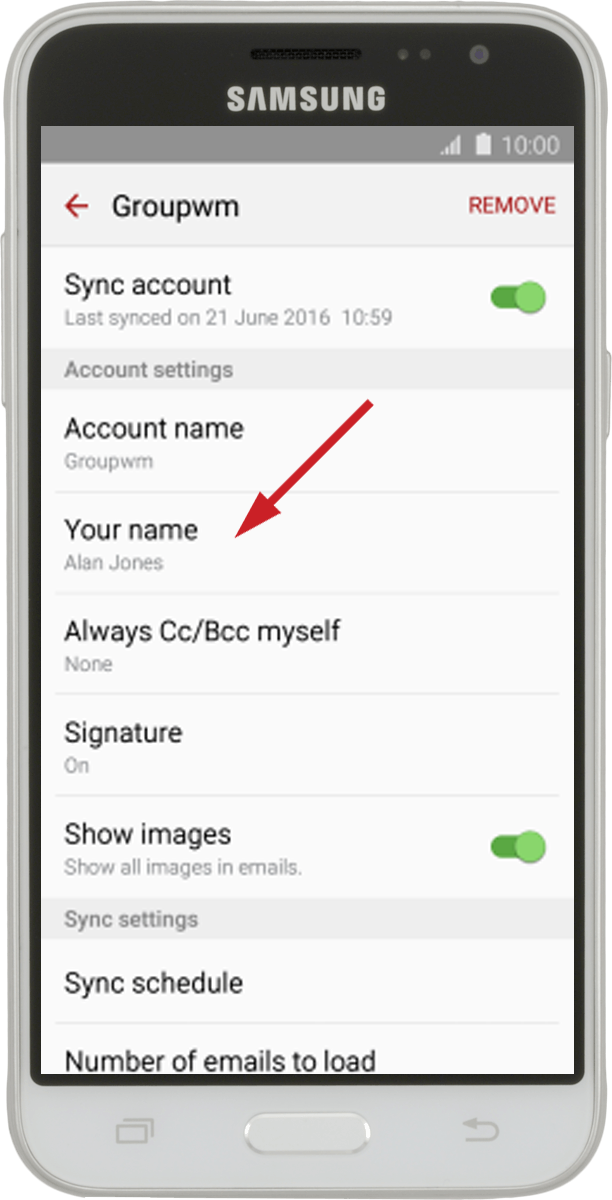
Key in the required sender name and press OK.
Step 17: Return to the home screen
Press the Home key to return to the home screen.